Running SmolVLM Locally in Browser with Transformers js featured
Dwelling » Weblog » Working SmolVLM Regionally in Your Browser with Transformers.js
In our earlier two tutorials:
We mentioned SmolVLM (variations 1 and a couple of) in depth. We explored its structure, coaching course of, benchmarks, and extra. We additionally demonstrated multi-image understanding duties utilizing the SmolVLM2 mannequin and constructed a Gradio interface to generate spotlight reels from long-duration movies.
Now, we’re taking the following step: working the SmolVLM mannequin straight within the browser utilizing Transformers.js, Subsequent.js, and Tailwind CSS. This tutorial will information you step-by-step, with an in depth breakdown of each line of code and the reasoning behind it.
By the tip, you’ll have a browser-based multimodal chatbot that understands photos and textual content concurrently, all working domestically and not using a backend.
To discover ways to run the SmolVLM mannequin in your browser, simply hold studying.
Would you want instant entry to three,457 photos curated and labeled with hand gestures to coach, discover, and experiment with … without cost? Head over to Roboflow and get a free account to seize these hand gesture photos.
Want Assist Configuring Your Growth Surroundings?
Having bother configuring your growth atmosphere? Need entry to pre-configured Jupyter Notebooks working on Google Colab? You should definitely be part of PyImageSearch College — you can be up and working with this tutorial in a matter of minutes.
All that mentioned, are you:
Quick on time?
Studying in your employer’s administratively locked system?
Eager to skip the effort of preventing with the command line, package deal managers, and digital environments?
Able to run the code instantly in your Home windows, macOS, or Linux system?
Acquire entry to Jupyter Notebooks for this tutorial and different PyImageSearch guides pre-configured to run on Google Colab’s ecosystem proper in your net browser! No set up required.
And better of all, these Jupyter Notebooks will run on Home windows, macOS, and Linux!
We’ll construct a browser-based chat interface powered by the SmolVLM, a small but environment friendly vision-language mannequin launched by HuggingFace. As soon as it’s working, customers can:
Add a number of photos
Sort questions on these photos
Get real-time solutions from the SmolVLM mannequin
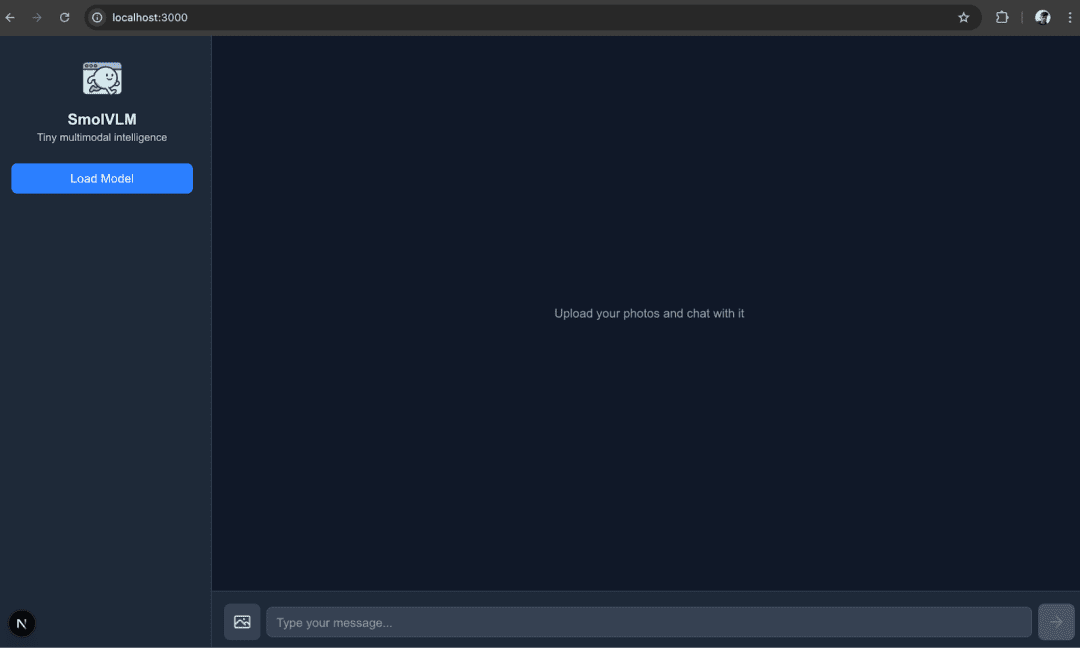
Determine 1: Multimodal Chatbot Launch Web page (supply: picture by the writer)
The key sauce is Transformers.js mixed with WebGPU: Transformers.js lets us load and run Hugging Face fashions in JavaScript, and WebGPU provides us the GPU acceleration we want for quick inference. That mixture brings three instant benefits:
Zero Server Value: the mannequin runs client-side, so that you don’t want a backend
Privateness by Design: photos and textual content keep on the person’s gadget
Actual-Time Interactivity: outputs can stream straight into the chat UI for a clean expertise
For the UI and app construction, we use Subsequent.js and Tailwind CSS for speedy, responsive styling. Architecturally, the app facilities on a fundamental web page (the UI), a Net Employee that runs the mannequin off the principle thread, and a handful of small utility parts for chat bubbles, picture previews, progress indicators, and extra.
Earlier than we dive into the code, let’s perceive the 2 fundamental constructing blocks in short — SmolVLM and Transformers.js — so why this strategy works and the place its limits are.
SmolVLM is designed to be light-weight and sensible. Not like large multimodal fashions that require server-class GPUs, SmolVLM trades parameter rely for effectivity, enabling it to run in memory-constrained environments (e.g., the browser). Key design objectives are:
Fewer Parameters: so the mannequin matches gadgets with restricted RAM,
Optimized Structure: that balances accuracy and velocity, and
Actual-World Utility: for duties corresponding to picture captioning, Visible Query Answering (VQA), and doc understanding.
In observe, SmolVLM accepts photos + textual content as inputs and returns textual outputs that replicate its visible understanding. As a result of the mannequin is deliberately compact, it turns into an excellent candidate for on-device inference the place privateness and responsiveness matter.
Transformers.js is the JavaScript counterpart of the Hugging Face Transformers Python library. It brings mannequin loading and inference to browsers, and helps a number of execution backends:
WebGPU: leverages trendy GPUs straight from the browser for accelerated inference
WebGL: GPU acceleration fallback for gadgets that don’t assist WebGPU
WASM (WebAssembly): CPU execution, slower, however works nearly in every single place
Essential options that make Transformers.js perfect for this challenge:
Hub integration: load fashions straight from the Hugging Face Hub, just like the Python transformers API
Multimodal Help: processors and fashions that settle for each photos and textual content
Streaming Technology: token-by-token callbacks let the UI present partial outputs as they arrive, yielding a real-time chat expertise
Put SmolVLM and Transformers.js collectively and also you get a sensible, personal, serverless option to run multimodal AI within the browser. The principle advantages are apparent: low value, robust privateness, and nice UX. The trade-offs are additionally vital to acknowledge:
Mannequin Measurement Limits: very giant fashions nonetheless received’t match comfortably in most browsers; SmolVLM is sufficiently small to make this doable.
System Variability: efficiency relies upon closely on the person’s gadget and whether or not it helps WebGPU.
Inference-Solely: we’re doing inference within the browser; coaching or heavy fine-tuning nonetheless requires devoted servers.
Earlier than we begin constructing, let’s arrange the event atmosphere. You’ll want Node.js (and some associated instruments) to run our challenge.
Node.js: A JavaScript runtime that permits us to run JavaScript outdoors the browser. Required for Subsequent.js growth.
npm (Node Bundle Supervisor): Comes bundled with Node.js. It manages dependencies (putting in, updating, and eradicating libraries).
nvm (Node Model Supervisor): Helps handle a number of variations of Node.js on the identical machine. Helpful in case your tasks want completely different variations.
npx: A package deal runner that comes with npm. It enables you to run instructions straight from npm with out globally putting in the package deal (e.g., npx create-next-app).
To put in Node.js in your system, open your terminal and run:
# Obtain and set up nvm:
curl -o- https://uncooked.githubusercontent.com/nvm-sh/nvm/v0.40.3/set up.sh | bash

# in lieu of restarting the shell
. "$HOME/.nvm/nvm.sh"

# Obtain and set up Node.js:
nvm set up 22

# Confirm the Node.js model:
node -v # Ought to print "v22.19.0".

# Confirm npm model:
npm -v # Ought to print "10.9.3".
Right here’s what we did:
Put in nvm, which manages Node.js variations (Line 2)
Loaded nvm into the present shell session (Line 5)
Put in Node.js v22, which mechanically comes with npm(Line 8)
Verified that each Node.js and npm are working (Strains 11 and 14)
For Home windows, obtain the installer straight from the Node.js official web site. It will set up each Node.js and npm. In case you want model administration like nvm, you should use nvm-windows.
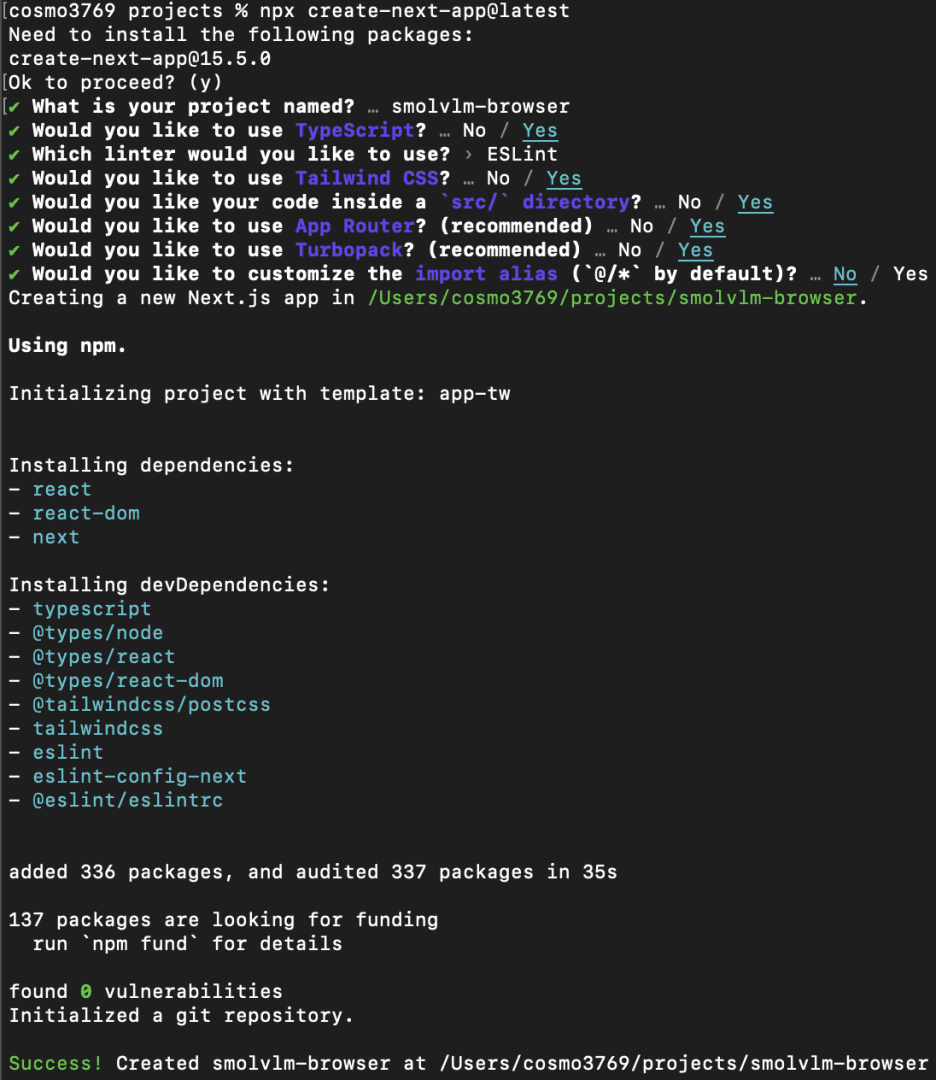
Now that Node.js is put in, let’s create a brand new Subsequent.js challenge:
npx create-next-app@newest
Right here:
npx: downloads and runs the package deal straight with out putting in it globally.
create-next-app: bootstraps a full Subsequent.js challenge with all essential configuration.
Once we run this, the CLI will immediate us with a number of configuration questions. Under is the precise setup we’ll use:
What’s your challenge named? → smolvlm-browser
Would you want to make use of TypeScript? → Sure (TypeScript offers kind security and a greater growth expertise).
Which linter would you want to make use of? → ESLint (default and broadly supported).
Would you want to make use of Tailwind CSS? → Sure (we’ll use Tailwind for fast, utility-first styling).
Would you want your code inside a src/ listing? → Sure (retains the challenge construction clear and scalable).
Would you want to make use of App Router? (beneficial) → Sure (Subsequent.js 13+ App Router is the fashionable option to construct apps).
Would you want to make use of Turbopack? (beneficial) → Sure (Subsequent.js’s quick bundler, perfect for growth).
Would you prefer to customise the import alias (@/* by default)? → No (we’ll follow the default @/* which already works effectively).
Determine 2: Subsequent.js challenge set up within the CLI (supply: picture by the writer)
As soon as we verify these choices, Subsequent.js will mechanically generate the challenge with the required setup. After set up, we are able to transfer into the challenge folder:
Earlier than transferring on to the Undertaking Construction, let’s set up a number of required libraries. We set up it utilizing the command npm i .
@huggingface/transformers
That is the core library for working Hugging Face fashions in JavaScript/TypeScript. It offers entry to AutoProcessor, AutoModelForVision2Seq, and streaming textual content technology.
In our challenge, it powers the SmolVLM mannequin, handles picture and textual content inputs, and manages mannequin inference within the browser through WebGPU.
better-react-mathjax
This library permits rendering mathematical formulation in React utilizing MathJax. Helpful if we need to show LaTeX or complicated math within the chat interface or any part. It ensures formulation are secure, responsive, and high-quality within the UI.
dompurify
A library to sanitize HTML and stop XSS assaults. When displaying user-generated content material or parsed Markdown (like from marked), dompurify ensures that no malicious HTML or scripts are executed within the browser.
framer-motion
A React animation library for clean UI transitions. It may be used to animate chat messages, hover results, and buttons, making the interface really feel extra interactive and responsive.
marked
A quick Markdown parser. Converts Markdown textual content to HTML, enabling your app to render formatted messages or user-entered content material. Works hand in hand with dompurify to make sure security when rendering HTML from Markdown.
With the Subsequent.js boilerplate prepared and libraries put in, we’re all set to begin integrating Transformers.js and the SmolVLM mannequin.
After creating the Subsequent.js boilerplate and putting in the required libraries, right here’s how we’ll set up our information for constructing the browser-based multimodal chatbot with Transformers.js and SmolVLM:
public/
 brand.png               # App brand

src/
 app/
   web page.tsx             # Predominant utility UI
   employee.ts            # Net Employee that hundreds and runs the mannequin

 icons/
   ArrowRightIcon.tsx   # Ship message button
   CrossIcon.tsx        # Take away/shut button
   ImageIcon.tsx        # Add picture button
   StopIcon.tsx         # Cease/interrupt button

 utilities/
   Chat.tsx             # Chat interface (messages, person & mannequin bubbles)
   ImagePreview.tsx     # Picture preview with delete possibility
   Progress.tsx         # Progress bar for mannequin loading state
   varieties.ts             # TypeScript kind definitions
   utils.tsx            # Helper features (small utilities)
This file is the single-page React consumer that builds the UI, manages person enter (textual content + photos), communicates with the net employee that runs the mannequin, reveals progress, and renders the chat.
"use consumer";

import { useEffect, useState, useRef } from "react";
import Chat from "@/utilities/Chat";
import ArrowRightIcon from "@/icons/ArrowRightIcon";
import StopIcon from "@/icons/StopIcon";
import Progress from "@/utilities/Progress";
import ImageIcon from "@/icons/ImageIcon";
import ImagePreview from "@/utilities/ImagePreview";
import kind { Message, MessageContent } from "@/utilities/varieties";

const STICKY_SCROLL_THRESHOLD = 120;
We begin with "use consumer" to mark this file as a Subsequent.js consumer part. That ensures this code runs within the browser (not on the server). That is required as a result of we depend on browser-only APIs (navigator, Employee, DOM refs).
Subsequent, we outline commonplace React hooks — useEffect, useState, and useRef
useRef is later used for the Employee occasion and DOM references (textarea, chat container).
useState holds the reactive variables (standing, messages, photos).
useEffect units up unwanted effects (employee lifecycle, window resize, and so on.).
We additionally import UI parts and icons (Chat, Progress, ImagePreview, icons). Importing varieties (Message, MessageContent) provides kind security in TypeScript.
STICKY_SCROLL_THRESHOLD is a numeric fixed used when auto-scrolling the chat to the underside — it determines whether or not to “stick” to the underside (so the person studying older messages isn’t abruptly pressured down).
Line 14 defines the App() perform, which serves because the utility’s place to begin.
employee: Holds the Net Employee occasion so we are able to put up messages and obtain occasions. Storing it in a ref ensures the employee isn’t recreated on each re-render.
DOM refs (textareaRef, chatContainerRef, imageUploadRef): Allow us to straight manipulate DOM components — for instance, auto-resizing the textarea, auto-scrolling the chat container, and triggering the file enter for picture uploads.
gpuSupported: Begins as null till we detect WebGPU availability. As soon as resolved to true or false, it helps render SSR-safe placeholders to keep away from mismatches between server and consumer.
standing: Tracks the model-loading section:
null: preliminary state (present “Load mannequin” button)
"loading": mannequin information are being downloaded and initialized
"prepared" mannequin is absolutely loaded and interactive
error: Shops error messages (if the employee reviews failures), and shows them within the UI.
loadingMessage: Holds pleasant standing messages (e.g., “Downloading weights…”) proven alongside the progress bar throughout loading.
progressItems: An array of objects used to render particular person progress bars for every mannequin file being downloaded by the employee.
isThinking / isStreaming: Signify two levels of assistant response:
isThinking: Earlier than the primary token arrives (the assistant is getting ready a solution).
isStreaming: As soon as tokens begin arriving (the assistant is outputting the response).
messages, photos, enter: Retailer the chat dialog historical past, uploaded photos (as information distinctive useful resource identifiers (URIs)), and the person’s present enter textual content.
tps / numTokens: Metrics obtained from the employee throughout streaming, representing tokens per second and whole tokens generated.
Collectively, these states and refs kind the spine of the chat app, enabling it to handle person enter, render messages, stream mannequin outputs, and deal with real-time progress and error reporting.
// detect WebGPU solely on consumer
 useEffect(() => {
   if (typeof navigator !== "undefined" && "gpu" in navigator) {
     setGpuSupported(true);
   } else {
     setGpuSupported(false);
   }
 }, []);
Subsequent, we arrange a useEffect hook to detect WebGPU assist within the person’s browser:
useEffect: Runs solely on the consumer facet, not throughout server-side rendering (SSR).
typeof navigator !== "undefined": Ensures we’re working in a browser (not on the server).
"gpu" in navigator: Checks whether or not the browser helps the navigator.gpu API required for WebGPU inference.
If supported, set gpuSupported to true; in any other case, set it to false.
The empty dependency array [] ensures this impact runs as soon as on mount.
This step is vital as a result of our app could run in environments with out WebGPU assist. We use this flag later to determine whether or not to load the mannequin or present a fallback/error message.
Subsequent, we outline the onEnter perform. This perform is triggered each time the person submits a message (urgent Enter or clicking the ship button):
Parameters
message: the textual content typed by the person.
photos: an array of uploaded picture information (information URIs).
Step 1: Assemble content material
Every picture is wrapped in an object: { kind: "picture", picture }.
The person’s textual content is wrapped as { kind: "textual content", textual content: message }.
Collectively, these kind the MessageContent[] array for one chat flip.
Step 2: Replace Chat Historical past
setMessages((prev) => [...prev, { role: "user", content }]) appends the brand new person message (with photos and textual content) to the dialog state.
Step 3: Reset Helper States
setTps(null): Clears tokens-per-second metrics earlier than the assistant replies.
setInput(""): Clears the textual content enter field.
setImages([]): Clears the staged picture previews (since they’re now a part of the chat).
In brief, onEnter takes the person’s enter (textual content + photos), codecs it right into a unified message object, appends it to the chat historical past, and resets the UI so the person can proceed chatting seamlessly.
Subsequent, we outline the onInterrupt perform. This perform permits the person to cease the assistant mid-response if wanted:
Objective: Generally, the assistant may generate a really lengthy response. As a substitute of ready, the person can click on the “Cease” button.
Step 1: Verify for Employee
We first confirm that employee.present exists (which means the Net Employee is working).
Step 2: Ship Interrupt Sign
We name employee.present.postMessage({ kind: "interrupt" }).
Sends a message to the employee thread to cease producing additional tokens.
The employee working the SmolVLM mannequin listens for this "interrupt" message. As soon as obtained, it halts the inference course of instantly, giving management again to the person.
We additionally outline a helper perform resizeInput to make the chat enter field mechanically develop and shrink based mostly on the textual content size:
Step 1: Guard Clause
If textareaRef.present is null (not but mounted), we return.
Step 2: Reset Peak
We quickly set the peak to "auto". This clears the present peak, permitting the browser to recalculate the textual content’s pure peak.
Step 3: Calculate the New Peak
goal.scrollHeight provides the complete peak wanted to suit the textual content.
We clamp this between 24px (minimal) and 200px (most) utilizing Math.max and Math.min.
This prevents the field from changing into too small or taking over the entire display.
Step 4: Apply New Peak
We assign the calculated peak again to goal.fashion.peak.
 useEffect(() => {
   resizeInput();
 }, [input]);
Lastly, we tie this perform to React’s state updates:
This ensures that each time the enter state adjustments (each time the person varieties or deletes textual content), the enter field resizes mechanically to suit the content material.
In brief, this perform provides the chatbox a dynamic peak — all the time tall sufficient to suit the textual content however capped at a user-friendly measurement.
Now, underneath useEffect, we examine if a employee already exists. employee is saved in a useRef, so it persists throughout renders with out reinitializing. This prevents a number of employees from being created on each re-render.
new Employee(...) spins up a Net Employee. new URL("./employee.ts", import.meta.url) is Vite/webpack’s option to bundle and find the employee file appropriately. { kind: "module" } tells the browser this employee is an ES module (so you should use import inside employee.ts).
This employee runs in a separate thread — it received’t block the UI whereas the mannequin hundreds or generates tokens.
Instantly sends a "examine" message to the employee.
This acts like a handshake:
Confirms the employee began efficiently.
Let the employee reply to show communication works.
The onMessageReceived perform listens for messages from the Net Employee (employee.ts). Every message features a standing subject consisting of the employee stage. Primarily based on that, we replace React state to replicate progress, streaming, or errors.
Breakdown of change (e.information.standing)
"loading"
The Employee says the mannequin is loading.
setStatus("loading"): updates UI to indicate loading state.
setLoadingMessage(e.information.information): show what’s being loaded (e.g., mannequin weights).
"provoke"
The Employee begins downloading a brand new file.
We add that file to progressItems so the progress bar reveals up.
"progress"
Employee reviews partial obtain progress.
We replace the matching file’s progress in progressItems.
"achieved"
File completed downloading.
Take away it from progressItems.
"prepared"
The Employee completed establishing and is prepared for inference.
setStatus("prepared"): The UI reveals that the mannequin is able to use.
"begin"
The Employee began producing a solution.
setIsThinking(true): assistant is “getting ready to answer.”
React’s useEffect requires cleanup to forestall reminiscence leaks and duplicate listeners.
Take away employee listeners (message, error): Ensures we don’t accumulate a number of message/error listeners throughout re-renders.
Take away window resize listener (resize): Avoids duplicate resize handlers after part re-renders or unmounts.
 // Set off technology on new messages
 useEffect(() => {
   if (messages.filter((x) => x.function === "person").size === 0) return;
   if (messages.at(-1)?.function === "assistant") return;
   if (employee.present) employee.present.postMessage({ kind: "generate", information: messages });
 }, [messages]);
This useEffectset offs mannequin inference (technology) each time a brand new person message is added.
Verify if there are any person messages (Line 168)
If no person messages exist but, we skip.
Prevents working technology at app startup.
Verify if the final message is already from the assistant (Line 169)
If the newest message is from the assistant, it means the mannequin is already producing or has completed responding.
Avoids sending a number of duplicate requests.
Ship a generate request to the employee (Line 170)
Posts a message to the Net Employee.
kind = "generate" tells the employee: “Run inference based mostly on the present dialog.”
information = messages offers the complete dialog historical past (person + assistant).
That is key: fashions normally want the complete chat historical past to generate coherent responses, not simply the newest query.
Dependency array (Line 171)
This impact re-runs solely when messageschange.
Which means: each time the person sends a brand new message → we set off mannequin technology.
This block screens messages, and each time the person provides a brand new one, it mechanically indicators the employee to begin producing a response.
This ensures the chat window auto-scrolls to the underside whereas the assistant is “considering” or “streaming” a response — just like how ChatGPT or messaging apps behave.
Guard clause (Line 174)
Do nothing if the chat container is lacking (e.g., earlier than render).
Do nothing if the assistant is idle — we solely scroll whereas producing.
Entry the chat container (Line 175)
Verify if the person is “close to the underside” (Strains 177 and 178)
scrollHeight: whole scrollable peak.
scrollTop: how far the person has scrolled from the highest.
clientHeight: seen peak of the container.
If the distinction (how removed from the underside) is smaller than the edge → we assume the person needs to remain pinned on the backside.
Scroll to the backside (Line 180)
Forces the chat to stay on the newest message.
Dependencies (Line 182)
Re-run each time new messages arrive or assistant state adjustments.
Legitimate enter examine (Line 184)
A boolean flag used to allow or disable the “Ship” button.
Enter is legitimate if the person has both:
Typed some textual content (enter.size > 0), or
Uploaded at the least one picture (photos.size > 0).
This prevents sending empty messages.
Collectively, these two elements hold the chat expertise clean (auto-scroll) and make sure that person enter is legitimate earlier than sending.
When the app first hundreds, it doesn’t but know whether or not WebGPU is supported, so gpuSupported begins as null. This block shows a impartial loading display (centered textual content with a light- or dark-aware background) till detection completes.
In Subsequent.js, parts are rendered on the server first. As a result of navigator.gpu doesn’t exist on the server, we wait till client-side hydration to examine it. Initializing with null avoids hydration mismatches and offers a secure placeholder.
if (!gpuSupported) {
   return (

       WebGPU isn't supported on this browser.

   );
 }
If the examine determines that gpuSupported === false, the app halts execution. As a substitute of working the mannequin (which might crash or fail), it shows a full-screen warning stating, “WebGPU isn’t supported on this browser.”
// Regular App format
return (
{/* Sidebar */}
This block handles two doable outcomes after the loading section.
First, if the standing is "prepared", it means the mannequin has completed loading efficiently. In that case, a affirmation message is displayed within the sidebar — “Mannequin Loaded Efficiently… ✅” — to obviously inform the person that the system is prepared to be used.
Second, if there’s any situation throughout loading or inference, the error variable will comprise an error message. When the error isn't null, a pink error message is proven as an alternative, alerting the person that one thing went mistaken.
Collectively, these situations present clear suggestions about whether or not the mannequin is able to run or if an issue occurred.
{/* Predominant Chat */}
The container serves because the central space the place conversations happen. Inside it, there’s a scrollable
that makes use of the chatContainerRef reference. This ref permits the code to manage scrolling (e.g., mechanically maintaining the view pinned to the newest messages when new ones seem).
Inside that scrollable space, the part is rendered. This part receives three props:
messages: the listing of all person and assistant messages.
isThinking: signifies whether or not the assistant is at present getting ready a response (earlier than tokens start streaming in).
isStreaming: whether or not the assistant is actively producing output tokens.
In brief, this part shows the dialog historical past and updates it dynamically because the assistant processes or streams new messages.
{/* Enter Bar */}
{/* Picture add button */}
{/* Textarea */}
This block implements the enter bar, the place customers work together with the assistant by importing photos or typing messages.
First, there’s the picture add button. It’s styled as an icon inside a label, which, when clicked, opens the file picker. The hidden permits customers to pick a number of photos. Every file is learn utilizing a FileReader, transformed right into a Knowledge URI, and saved within the photos state through setImages. This lets the chat show and ship photos together with textual content messages.
Subsequent is the textarea enter subject, referenced by textareaRef. It’s the place customers kind their prompts. The worth is certain to the enter state, so adjustments are tracked in actual time. The enter is disabled till the mannequin is absolutely loaded (standing === "prepared"). A key handler ensures that urgent Enter (with out Shift) sends the message through onEnter, whereas Shift+Enter permits multi-line enter.
In brief, this half handles person enter assortment — choosing photos and typing messages — and prepares them for sending to the assistant.
This block finalizes the enter part with two key elements: the ship/cease button and the picture preview listing.
The ship/cease button adjustments dynamically based mostly on the assistant’s state. If isStreaming is true (which means the assistant is at present producing a response), a pink cease button is proven. Clicking it calls onInterrupt, which sends an interrupt message to the employee, stopping the response. In any other case, when isStreaming is false, a blue ship button seems. This button is disabled until validInput (textual content or photos are current). When clicked, it triggers onEnter(enter, photos), submitting the person’s message and hooked up photos to the chat.
Under the button, if any photos are staged (photos.size > 0), an picture preview listing is displayed. Every preview is rendered utilizing the ImagePreview part, displaying a small thumbnail. Subsequent to every picture is a take away possibility that updates the photos state by filtering out the deleted merchandise. This enables customers to evaluate and handle uploaded photos earlier than sending them.
Altogether, this half handles sending messages, interrupting responses, and managing hooked up photos, making the chat interface interactive and user-friendly.
It runs the heavy Transformers.js code in a separate thread so the UI stays responsive. It hundreds the processor and mannequin, handles mannequin technology, streams tokens again to the principle thread, and responds to manage messages (examine, load, generate, interrupt, reset).
This block imports the core utilities required from Transformers.js.
AutoProcessor: preprocesses inputs (textual content and pictures) into the proper format understood by the mannequin.
AutoModelForVision2Seq: hundreds SmolVLM, which is a vision-to-text (vision-language) mannequin.
TextStreamer: streams tokens from the mannequin in actual time so responses seem as they're generated.
InterruptableStoppingCriteria: permits technology to cease halfway when the person clicks the cease button.
load_image: converts photos into tensors appropriate for the mannequin.
We additionally set MAX_NEW_TOKENS = 1024, which serves as a technology cap — stopping the mannequin from producing excessively lengthy responses.
let fp16_supported = false;
async perform examine() {
strive {
const adapter = await (navigator as any).gpu.requestAdapter();
if (!adapter) {
throw new Error("WebGPU isn't supported (no adapter discovered)");
}
fp16_supported = adapter.options.has("shader-f16");
} catch (e) {
self.postMessage({
standing: "error",
information: String(e),
});
}
}
We outline a flag, fp16_supported, to trace whether or not the browser helps 16-bit floating-point (FP16) precision on the GPU. Working fashions in FP16 is each extra memory-efficient and sooner, making this examine beneficial.
The examine perform runs asynchronously. It requests a GPU adapter from the browser’s WebGPU API. If no adapter is discovered, WebGPU isn’t out there, and an error is thrown.
If the adapter exists, the perform checks whether or not it helps the shader-f16 characteristic, which signifies that the GPU can deal with FP16 operations. The result's saved in fp16_supported.
If an error happens at any step, the perform sends a message again to the principle thread (self.postMessage) with standing: "error" and the error string so the UI can show it.
This SmolVLM class is a straightforward wrapper round loading the processor and mannequin for the SmolVLM-256M-Instruct checkpoint from Hugging Face, and it makes use of WebGPU for inference within the browser.
Right here’s what’s occurring:
Static Properties
model_id is mounted to "HuggingFaceTB/SmolVLM-256M-Instruct", the mannequin you’re loading.
processor and mannequin are declared as static, so they're shared throughout all calls. As soon as loaded, they’ll keep cached in reminiscence.
getInstanceTechnique
That is an async methodology that initializes and returns each the processor and the mannequin.
It makes use of the nullish coalescing task (??=) operator to make sure that the processor and mannequin are solely created as soon as. In the event that they’re already initialized, the present ones are reused.
Processor
Created with AutoProcessor.from_pretrained, which hundreds the pre/post-processing logic (e.g., tokenization, picture transforms).
Accepts a progress_callback to replace UI whereas loading.
Mannequin
Created with AutoModelForVision2Seq.from_pretrained.
It’s explicitly set to dtype: "fp32" (32-bit floating level) and gadget: "webgpu", so it runs within the browser utilizing WebGPU.
The identical progress_callback is handed right here as effectively.
Return Worth
Returns each processor and mannequin collectively as a Promise.all, so the caller can destructure them as soon as they’re prepared.
This construction makes it simple to load the mannequin solely as soon as and reuse it all through your app. Later, in the event you detect fp16_supported (out of your earlier employee examine), you'll be able to exchange dtype: "fp32" with "fp16" for sooner inference.
const stopping_criteria = new InterruptableStoppingCriteria();
let past_key_values_cache = null;
interface Message {
content material: any;
}
stopping_criteria
Creates a brand new occasion of InterruptableStoppingCriteria().
Used when producing textual content with Hugging Face fashions. It lets you interrupt technology midstream (e.g., if the person cancels or a cease situation is met).
past_key_values_cache
Initialized as null. It will later retailer cached consideration key/worth tensors from the mannequin’s earlier ahead move.
By reusing this cache, you'll be able to velocity up textual content technology because the mannequin doesn’t have to recompute previous states every time — it solely processes the brand new tokens.
MessageInterface
A TypeScript interface with a single subject:
async perform generate(messages: Message[]) {
// For this demo, we solely reply to the final message
messages = messages.slice(-1);
// Retrieve the text-generation pipeline.
const [processor, model] = await SmolVLM.getInstance();
// Load all photos
const photos = await Promise.all(
messages
.map((x) => x.content material)
.flat(Infinity)
.filter((msg) => msg.picture !== undefined)
.map((msg) => load_image(msg.picture)),
);
Line 54 defines an asynchronous perform to generate the assistant’s response and takes an array of Message objects as enter. For simplicity, this demo processes solely the most up-to-date message — slice(-1) retains solely the final factor of the array (Line 56).
Retrieve mannequin and processor (Line 59)
Calls the getInstance() methodology of the SmolVLM class. Returns the processor (for getting ready photos and textual content) and the mannequin (for producing responses).
Utilizing await ensures the mannequin and processor are absolutely loaded earlier than persevering with.
Load all photos from the messages (Strains 62-68)
messages.map(x => x.content material) extracts the content material arrays from every message.
.flat(Infinity) flattens nested arrays of content material.
.filter(msg => msg.picture !== undefined) retains solely content material gadgets which have a picture.
.map(msg => load_image(msg.picture)) converts every picture URI into an picture object that the mannequin can course of.
Promise.all(...) ensures all photos are loaded asynchronously earlier than continuing.
This block prepares the newest person message and hundreds all its related photos so the mannequin can generate a response.
// Put together inputs
const textual content = processor.apply_chat_template(messages, {
add_generation_prompt: true,
});
const inputs = await processor(textual content, photos, {
// Set `do_image_splitting: true` to separate photos into a number of patches.
// NOTE: This makes use of extra reminiscence, however can present extra correct outcomes.
// do_image_splitting: false,
});
let startTime;
let numTokens = 0;
let tps: quantity | undefined;
const token_callback_function = (tokens: any) => {
startTime ??= efficiency.now();
if (numTokens++ > 0) {
tps = (numTokens / (efficiency.now() - startTime)) * 1000;
}
};
const callback_function = (output: any) => {
self.postMessage({
standing: "replace",
output,
tps,
numTokens,
});
};
const streamer = new TextStreamer(processor.tokenizer, {
skip_prompt: true,
skip_special_tokens: true,
callback_function,
token_callback_function,
});
// Inform the principle thread we're beginning
self.postMessage({ standing: "begin" });
Put together textual content enter utilizing the processor (Strains 71-73)
apply_chat_template() codecs the dialog right into a immediate string appropriate for the mannequin. The add_generation_prompt: true possibility appends the mannequin’s response immediate, so it is aware of to generate output after the person’s message.
Course of textual content and pictures collectively (Strains 74-78)
Calls the processor with each textual content and photos. Converts them right into a model-ready enter format (tensors on WebGPU). The elective do_image_splitting can cut up photos into a number of patches for finer evaluation, but it surely makes use of extra reminiscence.
Initialize streaming metrics (Strains 80-82)
startTime: retains observe of when the technology begins.
numTokens: counts the variety of tokens generated thus far.
tps: tokens per second, calculated dynamically.
Token callback perform (Strains 83-89)
Known as each time a brand new token is generated. Units startTime to the primary time a token is generated. Updates tps (tokens per second) for efficiency monitoring.
Output callback perform (Strains 90-97)
Sends the present output string, token metrics, and tpsagain to the principle thread for dwell streaming.
Arrange the textual content streamer (Strains 99-104)
TextStreamer streams tokens as they're generated, somewhat than ready for the complete output.
Choices:
skip_prompt: don’t resend the immediate textual content.
callback_function and token_callback_function deal with updates in real-time.
Notify the principle thread that technology has began (Line 107)
Tells the principle thread to indicate the “assistant is considering” state within the UI.
This block prepares the textual content+picture enter, initializes token streaming, and units up callbacks to ship incremental outputs and token metrics to the principle thread in real-time. It successfully permits dwell assistant responses with streaming suggestions.
Calls the mannequin’s generate() perform to supply the assistant’s response. inputs accommodates the processed textual content and picture tensors. The elective past_key_values (at present commented out) would allow incremental technology for extra environment friendly future messages.
Sampling settings:
do_sample: false: deterministic technology (no random sampling).
repetition_penalty: 1.1: discourages repeating the identical tokens.
Different choices (e.g., top_k and temperature) are commented out, however might allow artistic sampling.
max_new_tokens: limits the variety of tokens generated on this name.
streamer: streams tokens in real-time again to the principle thread.
stopping_criteria: permits interruption if the person clicks cease.
return_dict_in_generate: true: returns a dictionary containing each past_key_values and generated sequences.
Error dealing with (Strains 126-131)
Catches any error throughout technology and sends it again to the principle thread for show within the UI.
Replace previous key values cache (Line 132)
Saves the past_key_values for potential future incremental technology, permitting sooner responses in the event you proceed the dialog.
Decode the generated sequences (Strains 134-136)
Converts the mannequin’s token IDs into readable textual content. Setting skip_special_tokens: true removes tokens like [CLS], [PAD], or any model-specific particular tokens.
Ship remaining output again to the principle thread (Strains 139-143)
Notifies the principle thread that the technology is completed. The decoded output is appended to the chat, and the UI can cease displaying the “considering” or streaming indicator.
This block generates the precise response. It streams tokens in real-time, applies deterministic or sampling-based technology, handles errors, caches previous key values for future effectivity, decodes the tokens into readable textual content, and at last sends the entire response again to the principle UI.
async perform load() {
self.postMessage({
standing: "loading",
information: "Loading mannequin...",
});
// Load the pipeline and reserve it for future use.
const [processor, model] = await SmolVLM.getInstance((x: unknown) => {
// We additionally add a progress callback to the pipeline in order that we are able to
// observe mannequin loading.
self.postMessage(x);
});
self.postMessage({ standing: "prepared" });
}
Notify fundamental thread that loading has began (Strains 146-149)
Instantly notifies the principle thread that mannequin loading is beginning, so the UI can show a loading message or progress bar.
Load the mannequin and processor (Strains 152-156)
Calls the SmolVLM.getInstance() static methodology to load each the processor and the mannequin.
Accepts an elective progress callback (x => self.postMessage(x)):
Any progress occasions emitted throughout mannequin loading are despatched again to the principle thread.
This enables the UI to replace particular person file obtain progress for the mannequin.
The loaded processor and mannequin are cached inside SmolVLM for future use, so repeated calls don’t reload them.
Notify fundamental thread that the mannequin is prepared (Line 158)
As soon as loading finishes efficiently, ship a prepared sign. The UI can now allow the chat enter, picture uploads, and the “ship” button.
The load() perform is accountable for loading the mannequin and processor, sending progress updates throughout the course of, and at last notifying the principle thread that the mannequin is prepared for inference. This retains the UI responsive and informs the person in regards to the loading state.
self.addEventListener("message", async (e) => {
const { kind, information } = e.information;
change (kind) {
case "examine":
examine();
break;
case "load":
load();
break;
case "generate":
stopping_criteria.reset();
generate(information);
break;
case "interrupt":
stopping_criteria.interrupt();
break;
case "reset":
past_key_values_cache = null;
stopping_criteria.reset();
break;
}
});
This code listens for messages from the principle thread and triggers the corresponding motion contained in the employee:
Pay attention for messages (Strains 161 and 162)
Each time the principle thread sends a message to the employee utilizing employee.postMessage, this occasion listener is triggered. The message is then destructured into kind (the motion to carry out) and information (the accompanying info, corresponding to person messages).
Change based mostly on message kind (Strains 164-187)
examine: calls the examine() perform to detect WebGPU assist and FP16 availability.
load: calls the load() perform to load the mannequin and processor, sending progress updates to the principle thread.
generate: resets the stopping_criteria and runs the generate() perform with the supplied messages. This triggers the mannequin to supply outputs.
interrupt: interrupts the present technology course of if it’s working. Helpful when the person clicks “Cease”.
reset: clears the cached previous key values and resets the stopping standards, getting ready the mannequin for a recent dialog.
This block serves because the employee’s central message router. It connects the principle thread’s actions (load mannequin, generate output, cease, reset) to the corresponding employee features, enabling asynchronous, non-blocking inference within the browser.
The file begins with "use consumer"; to point that this part is a client-side React part in Subsequent.js. This ensures that hooks like useState and useEffect work appropriately on the consumer.
Subsequent, we import the cn utility from our utils.tsx file. That is sometimes a small helper that conditionally combines class names, which is helpful for making use of dynamic CSS courses.
We additionally import the Message kind from varieties.ts. This offers kind security when dealing with chat messages, guaranteeing every message object has the proper construction anticipated by the part.
Lastly, we outline the props for the Chat part utilizing a TypeScript interface ChatProps. This contains:
messages: an array of Message objects representing the dialog historical past.
isThinking: a boolean indicating whether or not the assistant is at present getting ready a response (earlier than any tokens are streamed).
isStreaming: a boolean indicating whether or not the assistant is actively streaming its response token by token.
This setup ensures the part receives all essential information and state flags to render the chat dialog dynamically and appropriately.
The Chat perform is the principle part accountable for rendering the dialog between the person and the assistant. It receives three props: messages, isThinking, and isStreaming.
The primary block handles the empty state: if no messages exist but, it shows a centered placeholder with the textual content "Add your images and chat with it". This offers a pleasant immediate to the person earlier than any interplay happens.
As soon as messages exist, the part maps over every message and renders them sequentially. Every message is wrapped in a
with courses utilized conditionally utilizing the cn utility: messages from the person are aligned to the correct (ml-auto, items-end), whereas assistant messages are aligned to the left (items-start). Each have a max width of 80% to forestall stretching throughout the whole chat window.
Inside every message, the part iterates over message.content material. This enables the chat to render blended content material: textual content or photos. For textual content content material (c.kind === "textual content"), it renders a
with background shade relying on the sender: blue for the person and grey (with darkish mode assist) for the assistant. The textual content itself is displayed inside this styled container.
For picture content material (c.kind === "picture"), it renders an factor with rounded corners and a most width, displaying the uploaded or assistant-provided photos inline with the dialog.
In any case messages are rendered, the part reveals the assistant’s standing. If isThinking is true, it shows a small animated bouncing dot indicator to indicate the assistant is getting ready a response. If isStreaming is true (however isThinking is fake), it reveals a easy textual content indicator "Assistant is writing…", letting the person know that tokens are actively being streamed and the assistant is producing its response.
Total, this part handles dynamic rendering of textual content and picture messages whereas offering clear visible suggestions in regards to the assistant’s present state.
The ImagePreview part shows a small thumbnail of an uploaded picture with an choice to take away it. It accepts two fundamental props: src (the picture supply) and onRemove (a callback perform to take away the picture). It additionally helps commonplace
attributes through ...props.
The part makes use of a hover state (useState(false)) to trace whether or not the mouse is at present over the picture container. This enables the cross (take away) button to look solely when hovering.
The foundation
wraps the picture and the cross icon. It spreads any further props onto the container and units up onMouseEnter and onMouseLeave occasions to toggle the hover state. The container additionally has the category relative to make sure that the cross icon, which is completely positioned, is positioned relative to this container.
Contained in the container, a CrossIcon is rendered. Its onClick is linked to onRemove in order that clicking it removes the picture. The icon is completely positioned on the top-right nook (top-1 right-1) and solely seen when hover is true; in any other case, it’s hidden.
Lastly, the factor shows the precise picture, filling the container whereas sustaining the facet ratio utilizing object-cover, and it has rounded corners for a neat look.
Total, this part offers a compact, reusable picture preview with a hover-based take away button, good for displaying uploaded photos in a chat or kind interface.
The Progress part visually represents the progress of file downloads or model-loading duties within the SmolVLM app. It accepts three props:
textual content: the label for the progress merchandise, normally the filename or process description.
proportion: the completion proportion of the duty, which defaults to 0 if not supplied.
whole: the whole measurement of the file or process, used to indicate a human-readable measurement.
The formatBytes perform converts a numeric byte worth right into a human-readable format (B, kB, MB, GB, TB). It calculates the suitable unit by taking the logarithm of the scale with base 1024 after which codecs the outcome with two decimal factors.
Within the part itself, a container
represents the complete progress bar, styled with a grey background. Inside it, one other
represents the finished portion of the progress bar, styled with a blue background and a dynamic width based mostly on the proportion prop. The internal
additionally shows the textual content together with the proportion, and if a legitimate whole is supplied, it appends the formatted whole measurement utilizing formatBytes.
Total, this part is a reusable, clear option to present the loading standing of a number of information or duties, with each visible and textual suggestions.
The varieties.ts file defines TypeScript varieties for the chat messages used within the SmolVLM app.
MessageContent: This can be a union kind that represents the content material of a single message. A message can both be:
An picture: { kind: "picture"; picture: string }: the place picture is a data-URL string of the uploaded or generated picture.
A textual content: { kind: "textual content"; textual content: string }: the place textual content is a string representing the written message content material.
Message: This kind represents a full chat message, which consists of:
function: both "person" or "assistant", indicating who despatched the message.
content material: an array of MessageContent gadgets. This enables a single message to comprise a number of items of content material (e.g., a mix of textual content and pictures).
These varieties present a structured option to deal with each textual content and picture messages, making it simpler to render them appropriately in parts corresponding to Chat.tsx and to take care of kind security all through the app.
import React from "react";
export perform cn(...courses: Array) {
return courses.filter(Boolean).be part of(" ");
}
The cn perform is a small utility that conditionally combines CSS class names right into a single string.
It accepts any variety of arguments (...courses) the place every argument generally is a string, false, null, or undefined.
Contained in the perform, courses.filter(Boolean) removes any falsy values (false, null, undefined, "").
Lastly, .be part of(" ") concatenates the remaining legitimate class names with areas, producing a single string prepared for use as a className attribute in JSX.
Course info:
86+ whole courses • 115+ hours hours of on-demand code walkthrough movies • Final up to date: December 2025 ★★★★★ 4.84 (128 Rankings) • 16,000+ College students Enrolled
I strongly imagine that in the event you had the correct instructor you could possibly grasp laptop imaginative and prescient and deep studying.
Do you assume studying laptop imaginative and prescient and deep studying needs to be time-consuming, overwhelming, and complex? Or has to contain complicated arithmetic and equations? Or requires a level in laptop science?
That’s not the case.
All you must grasp laptop imaginative and prescient and deep studying is for somebody to elucidate issues to you in easy, intuitive phrases. And that’s precisely what I do. My mission is to alter schooling and the way complicated Synthetic Intelligence matters are taught.
In case you're critical about studying laptop imaginative and prescient, your subsequent cease ought to be PyImageSearch College, essentially the most complete laptop imaginative and prescient, deep studying, and OpenCV course on-line immediately. Right here you’ll discover ways to efficiently and confidently apply laptop imaginative and prescient to your work, analysis, and tasks. Be a part of me in laptop imaginative and prescient mastery.
Inside PyImageSearch College you may discover:
&examine; 86+ programs on important laptop imaginative and prescient, deep studying, and OpenCV matters
&examine; 86 Certificates of Completion
&examine; 115+ hours hours of on-demand video
&examine; Model new programs launched recurrently, guaranteeing you'll be able to sustain with state-of-the-art strategies
&examine; Pre-configured Jupyter Notebooks in Google Colab
&examine; Run all code examples in your net browser — works on Home windows, macOS, and Linux (no dev atmosphere configuration required!)
&examine; Entry to centralized code repos for all 540+ tutorials on PyImageSearch
&examine; Simple one-click downloads for code, datasets, pre-trained fashions, and so on.
&examine; Entry on cellular, laptop computer, desktop, and so on.
On this challenge, we constructed a browser-based multimodal chat utility powered by the SmolVLM mannequin from Hugging Face. The app permits customers to add photos and work together with an AI assistant that may analyze visuals and generate textual content responses in actual time. Key options embrace WebGPU acceleration, streaming token updates, and progress monitoring throughout mannequin loading. The interface helps Markdown formatting, secure HTML rendering, and clean animations for a responsive person expertise. By leveraging libraries corresponding to @huggingface/transformers, better-react-mathjax, dompurify, framer-motion, and marked, we created a strong, interactive, and safe chat system that showcases the ability of recent multimodal AI straight within the browser.
Thakur, P. “Working SmolVLM Regionally in Your Browser with Transformers.js,” PyImageSearch, P. Chugh, S. Huot, G. Kudriavtsev, and A. Sharma, eds., 2025, https://pyimg.co/j1ayp
@incollection{Thakur_2025_Running-SmolVLM-Regionally-in-Browser-with-Transformers-js,
writer = {Piyush Thakur},
title = {{Working SmolVLM Regionally in Your Browser with Transformers.js}},
booktitle = {PyImageSearch},
editor = {Puneet Chugh and Susan Huot and Georgii Kudriavtsev and Aditya Sharma},
12 months = {2025},
url = {https://pyimg.co/j1ayp},
}
To obtain the supply code to this put up (and be notified when future tutorials are revealed right here on PyImageSearch), merely enter your electronic mail tackle within the kind beneath!
Obtain the Supply Code and FREE 17-page Useful resource Information
Enter your electronic mail tackle beneath to get a .zip of the code and a FREE 17-page Useful resource Information on Pc Imaginative and prescient, OpenCV, and Deep Studying. Inside you may discover my hand-picked tutorials, books, programs, and libraries that will help you grasp CV and DL!
In regards to the Writer
Hello, I’m Piyush! I’m a Machine Studying Engineer and Full Stack Net Developer with a ardour for open-source tasks, writing, and exploring new applied sciences.
Entry the code to this tutorial and all different 500+ tutorials on PyImageSearch
Enter your electronic mail tackle beneath to study extra about PyImageSearch College (together with how one can obtain the supply code to this put up):
What's included in PyImageSearch College?
Quick access to the code, datasets, and pre-trained fashions for all 500+ tutorials on the PyImageSearch weblog
Excessive-quality, effectively documented supply code with line-by-line explanations (guaranteeing precisely what the code is doing)
Jupyter Notebooks which might be pre-configured to run in Google Colab with a single click on
Run all code examples in your net browser — no dev atmosphere configuration required!
Help for all main working programs (Home windows, macOS, Linux, and Raspbian)
Full entry to PyImageSearch College programs
Detailed video tutorials for each lesson
Certificates of Completion for all programs
New programs added each month! — keep on prime of state-of-the-art tendencies in laptop imaginative and prescient and deep studying
PyImageSearch College is actually the perfect Pc Visions "Masters" Diploma that I want I had when beginning out. Having the ability to entry all of Adrian's tutorials in a single listed web page and having the ability to begin enjoying round with the code with out going by way of the nightmare of establishing all the things is simply superb. 10/10 would advocate.
Sanyam BhutaniMachine Studying Engineer and 2x Kaggle Grasp


); } })}


