

- October 18, 2020
- Vasilis Vryniotis
- . 3 Feedback
DejaDup is the default backup utility for Gnome. It’s a GUI for duplicity, focuses on simplicity, helps incremental encrypted backups and up till lately supported numerous cloud suppliers. Sadly as of model 42.0, all main cloud suppliers have been eliminated. Thus on condition that Ubuntu 20.10 ships with the particular model, any consumer who upgrades and has backups on Amazon S3 gained’t be capable of entry them. On this weblog publish, we’ll present an answer that can assist you to proceed taking backups on AWS S3 utilizing DejaDup.
The necessary rant (be happy to skip)
The elimination of the cloud suppliers mustn’t come as a shock. I’m not precisely positive which model of DejaDup deprecated them but it surely was across the launch of Ubuntu 17.10 once they have been all hidden as an possibility. So for 3 lengthy years, individuals who had backups on Amazon S3, Google Cloud Storage, Openstack Swift, Rackspace and so forth might nonetheless use the deprecated characteristic and put together for the inevitable elimination.
So why complain you would possibly ask? Nicely, to begin with, while you replace from an earlier model of Ubuntu to twenty.10, you don’t actually know that the all cloud suppliers are faraway from DejaDup. Therefore if one thing goes improper in the course of the replace, you gained’t be capable of simply entry your backups and restore your system.
One other large drawback is the shortage of storage choices on the final model of DejaDup. They determined to vary their coverage and help solely “consumer-targeted cloud companies” however presently they solely help Google Drive. In order that they eradicated all the associated fee environment friendly choices for mass storage and saved just one single very costly possibility. I’m not likely positive how that is good for the customers of the applying. Linux was at all times about having a alternative (an excessive amount of of it in lots of instances), so why not preserve a number of storage choices to serve each the skilled and inexperienced customers? Fortunately as a result of we’re on Linux, now we have possibility to repair this.
Learn how to use Deja Dup v42+ with AWS S3
WARNING: I’ve not examined totally the next setup so use it at your personal danger. If the pc explodes in your face, you lose your information, or your partner takes your children and leaves you, don’t blame me.
Putting in s3fs fuse
With that out of the way in which, let’s proceed to the repair. We are going to use s3fs fuse, a program that permits you to mount an S3 bucket by way of FUSE and successfully make it seem like an area disk. Fortunately you don’t need to compile it from supply because it’s on Ubuntu’s repos. To put in it, sort the next in your terminal:
sudo apt set up s3fs
Establishing your AWS credentials file
Subsequent, we have to configure your credentials. The s3fs helps two strategies for authentication: an AWS credential file or a customized passwd file. On this tutorial we’ll use the primary methodology however in case you are for the latter be happy to view the s3fs documentation on Github. To setup your credentials be sure that the file ~/.aws/credentials accommodates your AWS entry id and secret key. It ought to seem like this:
[default]
aws_access_key_id=YOUR_ACCESS_KEY_ID
aws_secret_access_key=YOUR_SECRET_ACCESS_KEY
Mounting your bucket to your native filesystem
As soon as your have your credentials file you might be able to mount your backup bucket. When you don’t bear in mind the bucket title you’ll find it by visiting your AWS account. To mount and unmount the bucket to/from a particular location sort:
# mount
s3fs BUCKET_NAME /path/to/location
# unmount
fusermount -u /path/to/location
Mounting the bucket like that is solely momentary and won’t persist throughout reboots. You possibly can add it on /and so forth/fstab however I imagine this solely works with the passwd file. If you wish to use your AWS credentials file a simple workaround it to create a shortcut in your Startup Purposes Preferences.
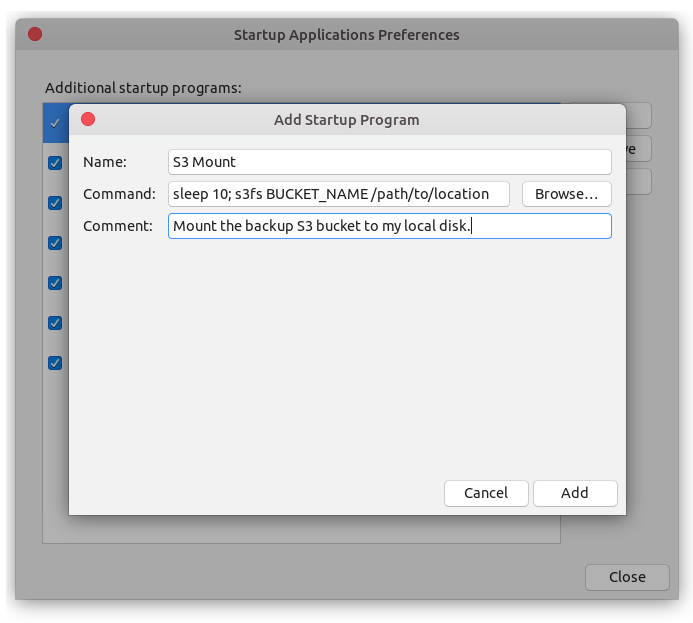
Notice that you would be able to add a small 10 sec delay to make sure that the WiFi is related earlier than you attempt to mount the bucket. Web entry is clearly essential for mounting it efficiently. In case you are behind VPNs or produce other complicated setups, you may as well create a bash script that makes the mandatory checks earlier than you execute the mount command.
Configuring DejaDup
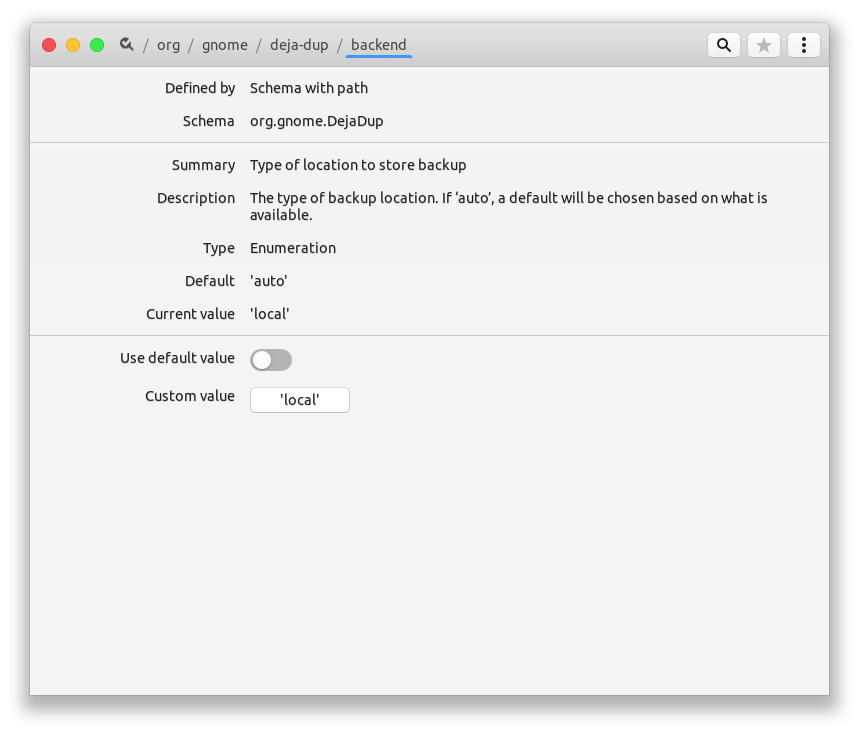
With the bucket mounted as an area drive, we will now simply configure DejaDup to make use of it. To start with we have to change the backend to native. This may be finished both through the use of a program like dconfig or the console with the next command:
gsettings set org.gnome.DejaDup backend 'native'
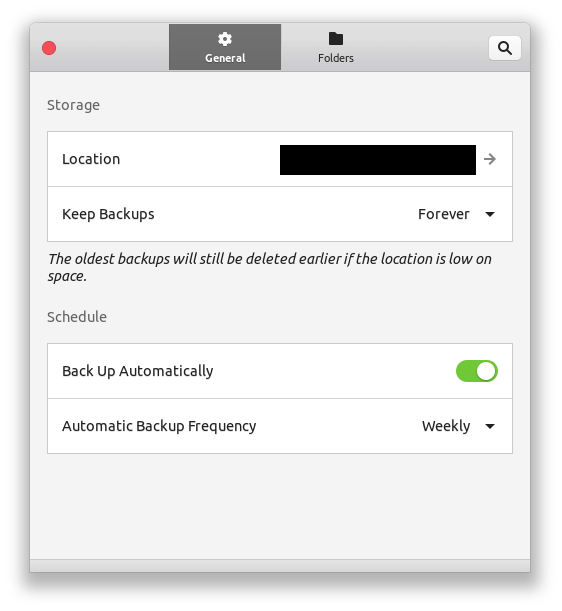
Lastly we open DejaDup, go to preferences and level the storage location to the listing that has your S3 backup information. Be sure to choose the subdirectory that accommodates the backup information; that is sometimes a subdirectory in your mount level that has title equal to your pc’s hostname. Final however not least, be sure that the S3 mount listing is excluded from DejaDup! To do that, test the ignored folders in Preferences.
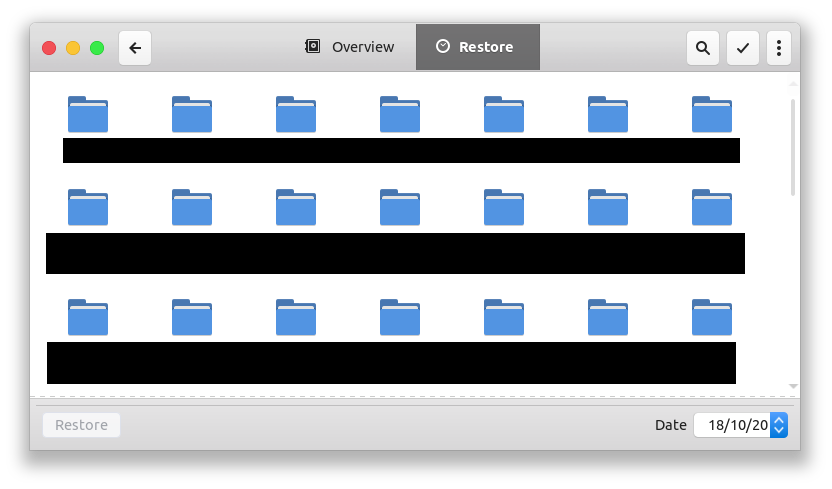
That’s it! Now go to your restore tab and DejaDup will be capable of learn your earlier backups. You can too take new ones.
Gotchas
There are some things to bear in mind on this setup:
- To start with, you should be related on the web while you mount the bucket. In case you are not the bucket gained’t be mounted. So, I counsel you rather than simply calling the mount command, to jot down a bash script that does the mandatory checks earlier than mounting (web connection is on, firewall permits exterior requests and so forth).
- Taking backups like that appears slower than utilizing the previous native S3 help and it’s prone to generate extra community site visitors (thoughts AWS site visitors prices!). That is anticipated as a result of DejaDup thinks it’s accessing the native file-system, so there is no such thing as a want for aggressive caching or minimization of operations that trigger community site visitors.
- You need to anticipate stability points. As we mentioned earlier, DejaDup doesn’t understand it writes information over the wire a lot of the functionalities that often exist in such setups (resembling retry-on-fail) are lacking. And clearly if you happen to lose connection halfway of the backup you’ll have to delete it and begin a brand new one to keep away from corrupting your future backups.
- Lastly take into account that this can be a very experimental setup and if you happen to actually wish to have a dependable resolution, you need to do your personal analysis and choose one thing that meets your wants.
In case you have a advice for an Open-Supply Backup resolution that permits regionally encrypted incremental backups, helps S3 and has a simple to make use of UI please go away a remark as I’m very happy to provide it a attempt.