

Monetary establishments akin to banks, cost processors, and on-line retailers face important challenges in detecting and stopping fraud and monetary crimes. Entity decision and graph algorithms will be mixed to assist fraud detection use circumstances akin to Card Not Current (CNP) fraud detection. A CNP transaction happens when a credit score or debit card cost is processed with out the bodily card being offered to the service provider, sometimes throughout on-line, phone, or mail-order purchases. These transactions carry greater fraud dangers as a result of retailers can’t bodily confirm the cardboard or the cardholder’s identification, making them significantly weak to fraudulent utilization.
Entity decision companies akin to AWS Entity Decision establish hyperlinks between entities utilizing shared attributes. Amazon Neptune Analytics, a memory-optimized graph database engine for analytics, enhances CNP fraud detection by enabling graph evaluation of complicated relationships between clients, transactions, and fraud patterns. When entities are resolved and matched, they create connections that may be saved and queried utilizing graph database buildings. Moreover, graph databases’ built-in assist for graph algorithms together with neighborhood detection allows environment friendly exploration of entity networks, making it simple to find hidden patterns and oblique connections between resolved entities. This mixed strategy facilitates fraud detection by shortly traversing relationships and figuring out uncommon patterns.
On this put up, we present how you should use graph algorithms to investigate the outcomes of AWS Entity Decision and associated transactions for the CNP use case. We use a number of AWS companies, together with Neptune Analytics, AWS Entity Decision, Amazon SageMaker notebooks, and Amazon Easy Storage Service (Amazon S3).
AWS Entity Decision ingests buyer knowledge from varied sources, standardizing and matching data to create a single view of the client with a persistent identifier. The persistent buyer identifier, buyer attributes, and transactions are then loaded into Neptune Analytics as vertices, and relationships between every entity type the perimeters of the graph. Amazon Neptune Workbench hosted Amazon SageMaker AI notebooks present the surroundings for investigators to evaluate the info. For extra particulars, see Accessing the graph.
The next diagram illustrates the answer structure.
The graph knowledge mannequin consists of a number of node sorts and edge relationships designed to characterize buyer and transaction knowledge. The nodes embody Group (containing persistent identifiers from AWS Entity Decision), E-mail, Buyer (with supply system buyer info like title and date of beginning), Credit score Card Account, Deal with, and Telephone. These nodes are related by means of relationships akin to HAS_CUSTOMER (linking Group to Buyer nodes with confidence scores), HAS_ACCOUNT (linking Buyer to Credit score Card Account nodes), HAS_PHONE, HAS_ADDRESS, and HAS_EMAIL. The mannequin is additional enhanced with transaction-related nodes like CnpCreditCardTxInit, CreditCardTx, and CnpInitFail, that are related by means of relationships that monitor the circulate of CNP transactions and their outcomes.The next diagram illustrates the graph knowledge mannequin.
The next desk lists the nodes and edges in additional element.
You’ll incur prices in your account for the AWS companies used within the instance. Though AWS presents the AWS Free Tier for some companies akin to SageMaker AI, evaluate the pricing pages for AWS Entity Decision and Amazon Neptune Analytics earlier than continuing. For assist with estimating prices, seek advice from the AWS Pricing Calculator.
To comply with together with this put up, you have to have the next sources.
AWS Entity Decision gives a number of workflow choices to establish potential duplicate entities. Machine studying (ML) workflows use an AWS offered ML mannequin that may deal with variations in matching fields akin to Identify, Deal with, E-mail Deal with, Telephone, and Date of Delivery. The output of the workflow will present a confidence rating, which signifies how probably the entities throughout the identical match group are duplicates based mostly on the educated mannequin. You should use rule-based workflows to configure matching logic based mostly on enterprise guidelines.
Choose a dataset such because the Freely extensible biomedical file linkage (FEBRL) dataset or create an instance dataset with at the very least three of the 5 matching fields that can be utilized by the ML workflow. For this put up, we used the Faker Python library to create mock matching fields (deal with, date_of_birth, electronic mail, firstname, lastname, full_name, and center) to carry out entity decision matching.
After you’ve got created the dataset, loaded it into an S3 bucket the place AWS Entity Decision workflows have learn permissions, and crawled the info utilizing AWS Glue, you have to outline a schema mapping. The schema mapping informs AWS Entity Decision workflows the right way to interpret the supply fields for matching workflows.
The next screenshot illustrates an instance schema mapping.
First, create a JSON file named ml-workflow.json within the present listing and add the next contents (change placeholders).
{
"workflowName": "",
"description": "Entity Decision and Neptune Analytics ML Workflow",
"inputSourceConfig": [
{
"applyNormalization": true,
"inputSourceARN": "arn:aws:glue:::table//",
"schemaName": ""
}
],
"outputSourceConfig": [
{
"applyNormalization": true,
"output": [
{"name": "address", "hashed": false},
{"name": "date_of_birth", "hashed": false},
{"name": "email", "hashed": false},
{"name": "full_name", "hashed": false},
{"name": "lastname", "hashed": false},
{"name": "middle", "hashed": false},
{"name": "phone_number", "hashed": false}
],
"outputS3Path": "s3:///entityresolution/output/"
}
],
"resolutionTechniques": {
"resolutionType": "ML_MATCHING"
},
"roleArn":"arn:aws:iam:::position/"
}
After you create the JSON file, run the next command to create the workflow:
Run the next command to execute the workflow:aws entityresolution start-matching-job --region --workflow-name
Remodel knowledge output
When the ML workflow is full, the output will be remodeled into a legitimate Neptune knowledge format and ingested into Neptune Analytics. The next code snippets present examples of the right way to rework the AWS Entity Decision knowledge output into the OpenCypher Bulk Load format.
Use the next code in your Neptune Pocket book to create nodes from the output of AWS Entity Decision. Substitute the placeholders with your individual values:
Use the next code to create edges from the output of AWS Entity Decision:
Load further datasets
We additionally need to complement the mock buyer knowledge with some generated transactions that simulate a buyer transaction workflow. Use the next code to load the info into an S3 bucket the place the Neptune Loader has permissions to learn from (change the placeholders with your individual values):
Neptune Analytics helps a number of mechanisms to load knowledge into the in-memory graph, together with loading from an current Neptune cluster and from Amazon S3. For this instance, we learn knowledge from Amazon S3 utilizing a batch load, the place the caller’s IAM position has the suitable permissions:
Analyze output with Neptune Analytics
Utilizing Neptune Analytics by means of Neptune Workbench, you'll be able to run highly effective graph algorithms like Louvain and weakly related elements to establish clusters of probably fraudulent actions and analyze relationships between resolved entities. For instance, you'll be able to shortly establish clusters of CNP transaction failures, analyze the variety of shared personally identifiable info (PII) parts between completely different entities, and assess danger based mostly on the variety of recognized unhealthy actors within the graph, making it an efficient device for detecting refined fraud patterns.
The Louvain algorithm is a neighborhood detection algorithm that helps establish clusters or communities inside a graph by optimizing modularity, which measures the density of connections inside communities in comparison with connections between communities. In Neptune Analytics, the Louvain algorithm can assist the invention of pure groupings in knowledge, akin to discovering buyer segments or detecting fraudulent clusters of accounts which can be working collectively.
The queries on this put up illustrate the usage of Louvain and weakly related elements, although outcomes will range based mostly in your particular dataset traits. In Neptune Analytics, the CALL key phrase invokes the algorithms, whereas mutate key phrase writes computed outcomes again to the graph as new properties on nodes or edges. We are going to use Neptune Pocket book’s visualization instruments to showcase question outcomes. There are additionally superior visualization instruments out there akin to Graph-explorer, an open-source device that you should use to browse graph-data with out writing queries.
First, let’s discover clusters throughout the graph for transactions the place they're related to CNPInitFail. We need to persist these clusters with an edge property, CNPFailCommunity:
Along with discovering clusters related to CNPInitFail, we need to analyze the AWS Entity Decision outcomes. Though clusters have already been created by AWS Entity Decision, we are able to create further clusters utilizing the graph algorithm and weakly related elements to generate clusters the place resolved clients may share at the very least one matching attribute:
Now that our clusters have been generated, let’s discover the biggest cluster of transactions generated by Louvain:
We are able to take this largest cluster of transactions and retrieve the related AWS Entity Decision attributes which can be related to the identical weakly related elements cluster:
Let’s drill down additional into to CNPInitFail, the place we choose a failure code to evaluate danger. Assume that there are solely three failure codes (1, 2, and three) generated within the previous transaction code, the place failure code 3 is the riskiest. We need to see if a number of AWS Entity Decision resolved entities are related to the failures:
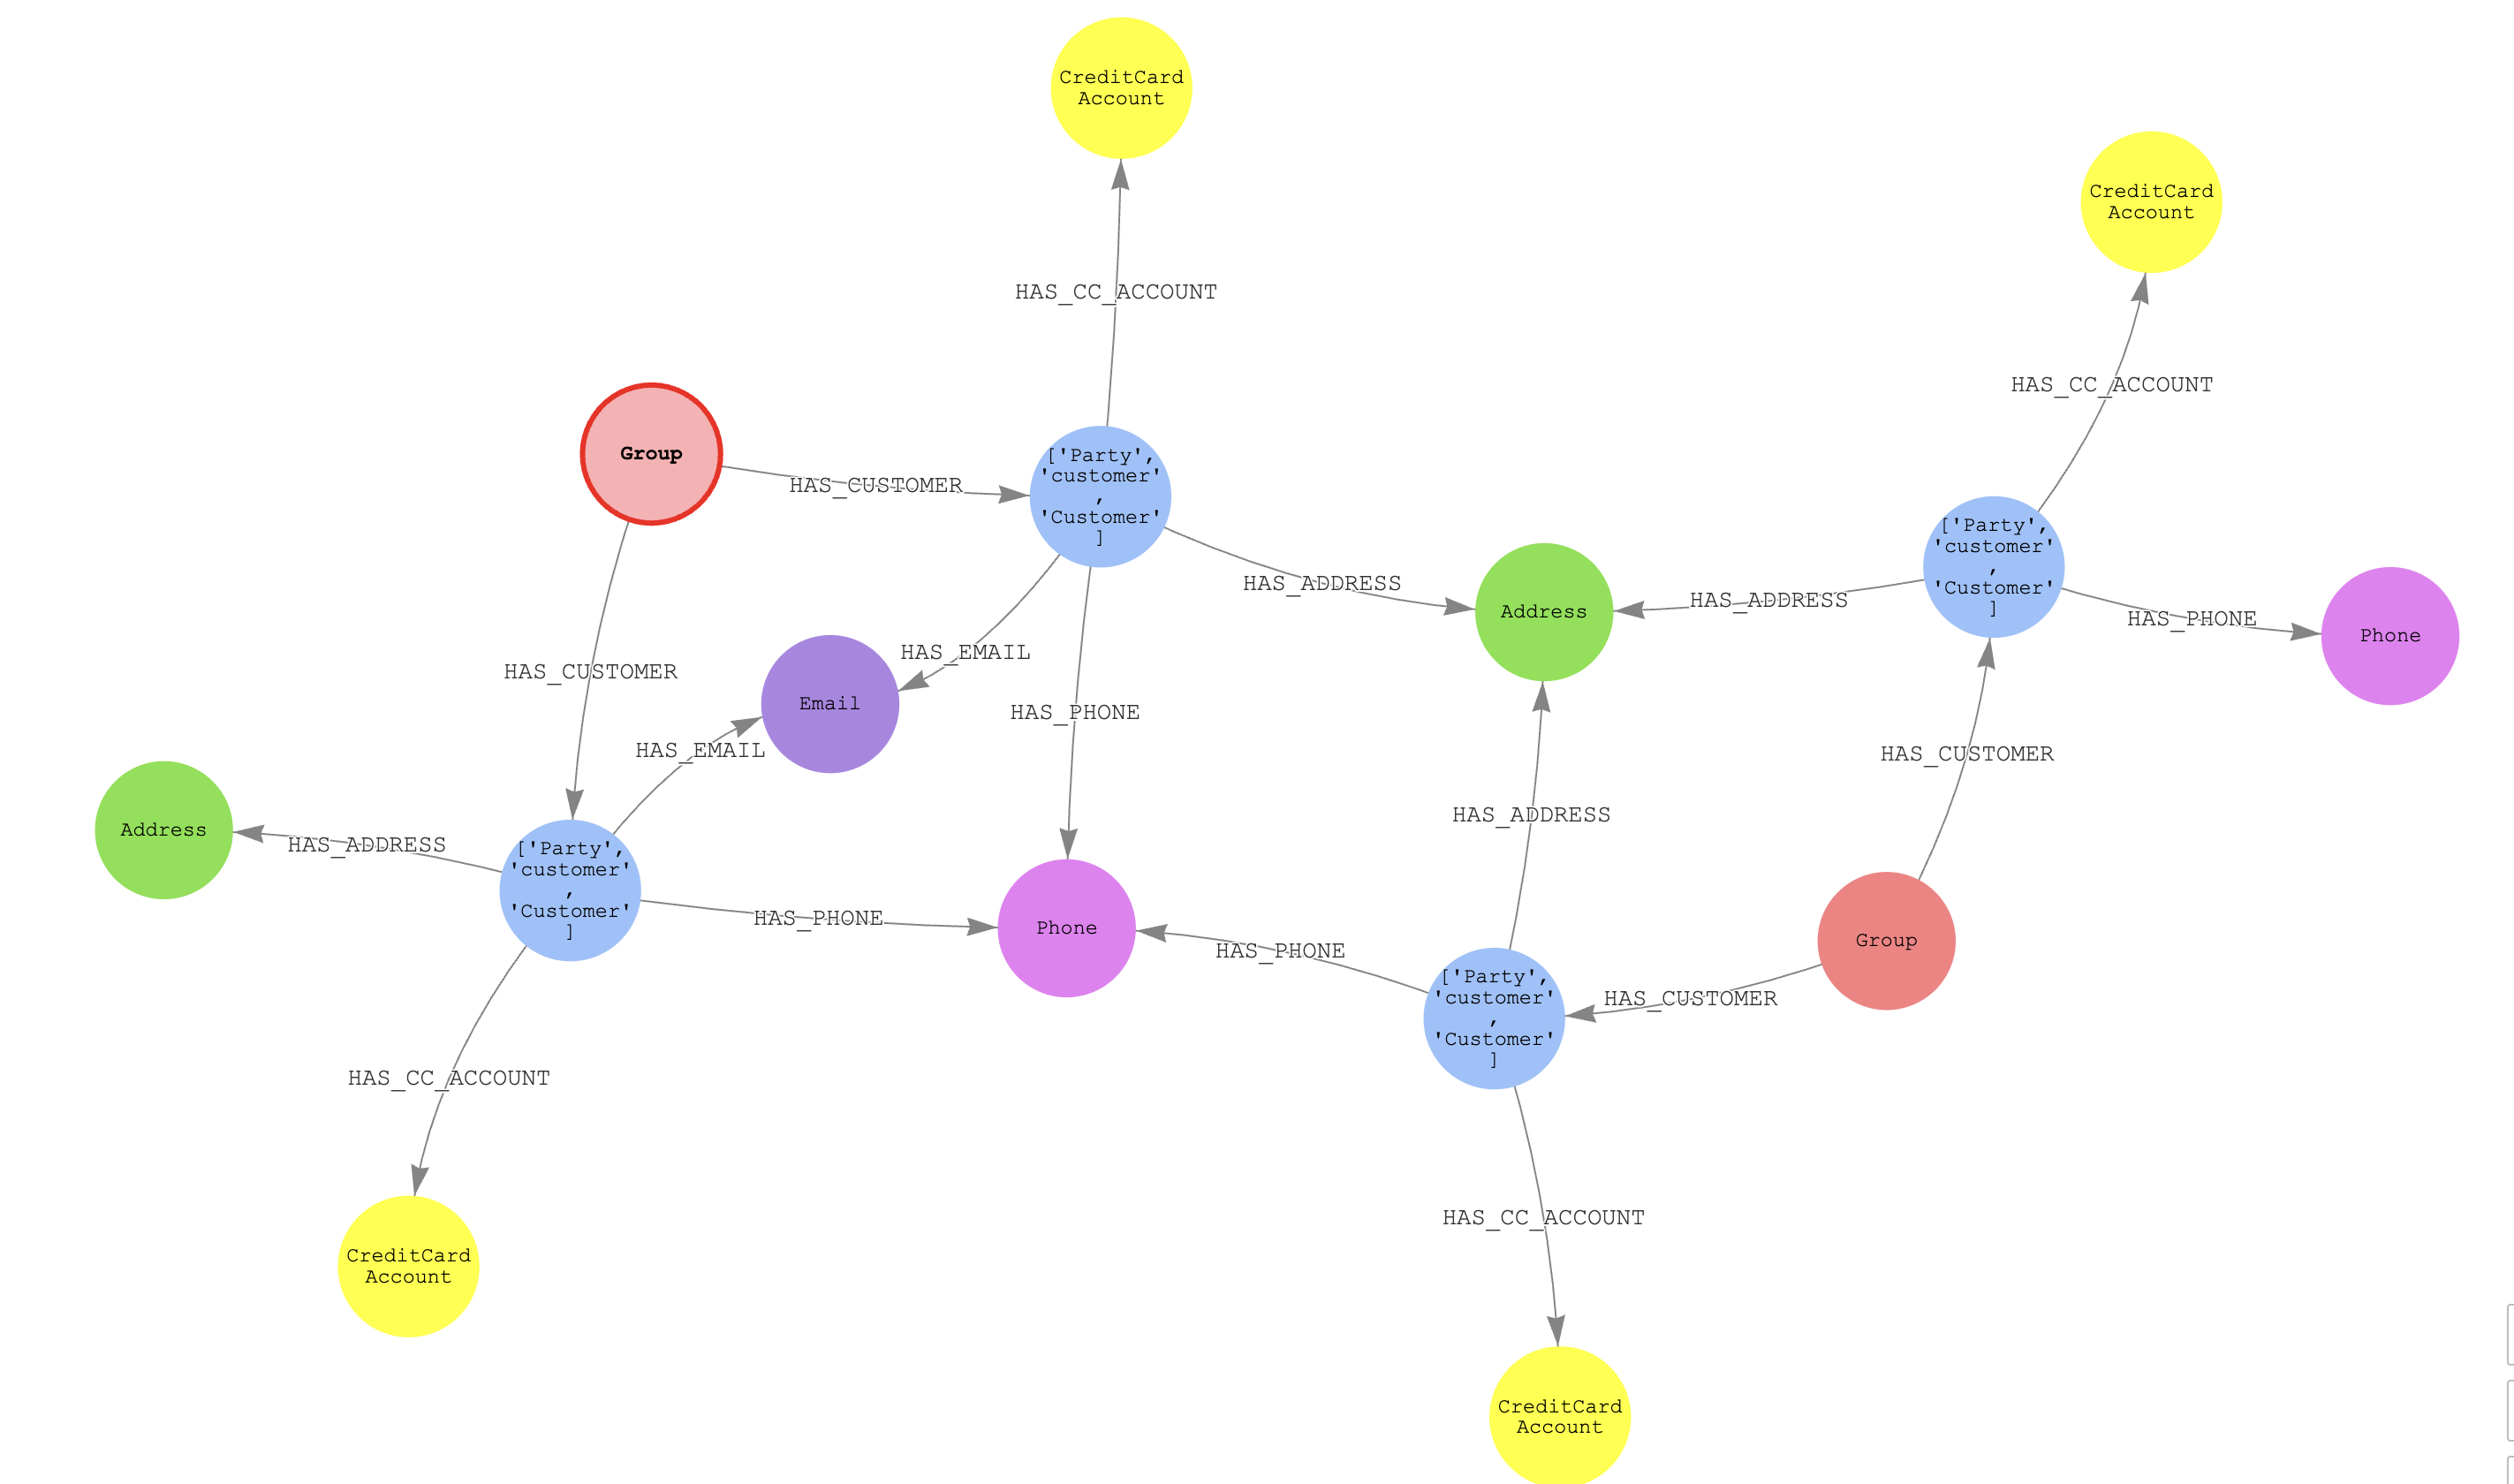
Given the group with the biggest variety of resolved entities (distinct AWS Entity Decision match IDs), we need to assess the variety of shared PII parts to evaluate if these entities’ distinct teams are two distinct unhealthy actors or a single unhealthy actor:
For visualization functions (remark out the the place not assertion), we are able to see two distinct Group nodes and 4 events. The 2 teams have a differing electronic mail deal with, telephone, and deal with that aren't shared. This implies that the 2 resolved entities is likely to be associated, as a result of they've shared the identical quantity and at the very least one deal with.
We are able to additionally carry out danger analytics based mostly on the variety of recognized unhealthy actors within the graph. The next question analyzes teams of resolved entities by calculating the ratio of unhealthy actors to whole clients inside every match group, ordered by the proportion of unhealthy actors per cluster. This evaluation helps establish which teams have the best focus of shoppers related to high-risk CNP transaction failures (for instance, motive code 3), offering investigators with a risk-based metric to prioritize their investigations.
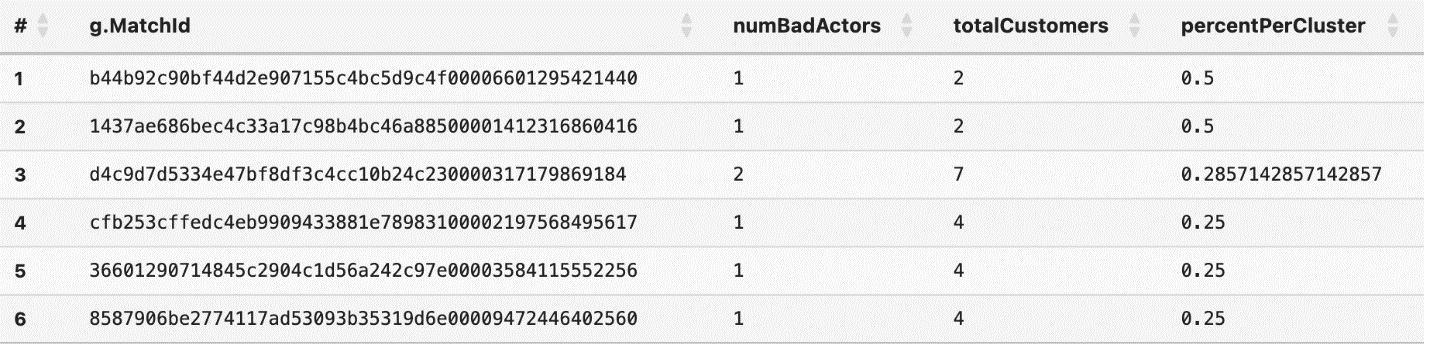
For instance, based mostly on the above output, the primary two outcomes have the next proportion of unhealthy actors within the cluster at 50% versus the third cluster with 30% of unhealthy actors within the cluster. Nevertheless, there are solely 2 whole clients inside teams 1 and a couple of, which can be an vital consideration for investigations.
Clear up
Whenever you’re finished, clear up your sources to cease incurring prices. You are able to do so utilizing the AWS CLI or the respective service consoles. For directions, seek advice from AWS Entity Decision, AWS Glue Tables, AWS Glue Crawlers, Neptune Notebooks, or Neptune Analytics documentation. You may also delete S3 buckets or objects created as a part of this train.
Conclusion
The mix of AWS Entity Decision and Neptune gives a strong resolution for monetary establishments to detect and stop CNP fraud. Through the use of AWS Entity Decision to match and standardize buyer data with the Neptune graph database, organizations can shortly establish suspicious patterns and relationships between entities. The answer on this put up demonstrated how one can rework resolved entities right into a graph construction, carry out superior analytics utilizing Neptune Analytics, and visualize complicated relationships between clients, accounts, and transactions. The combination with Neptune Workbench helps investigators effectively analyze clusters of probably fraudulent actions and assess the relationships between resolved entities.
To study extra about utilizing AWS Entity Decision or Neptune Analytics, contact your AWS account crew or go to the AWS Entity Decision and Amazon Neptune Person Guides.
Concerning the authors