

Introduction
Not too long ago I wanted to arrange a quite simple proof of idea (POC) to exhibit to myself and ultimately my staff that an concept would work. A POC is not manufacturing prepared, it would not should be sturdy and in my case wasn’t even going to be written utilizing the identical framework we use in manufacturing. I simply wanted to see if the combination would work as I believed it will. If it did, I might work with my staff to construct a manufacturing prepared model. If it did not work, no downside. I anticipated this POC to take about two hours of my time, together with preliminary analysis across the integration itself.
My background is using Python. I have been utilizing it for almost 15 years now. In my earlier function I utilized Sanic to construct our API. I’ve additionally used Django and Flask within the path, but it surely had been 5 or extra years so I used to be rusty in these. Plus, I’ve a flowery new guide written by Adam Hopkins, the core developer of Sanic and an incredible former colleague, known as Python Internet Growth with Sanic that I wished to work by. I have been which means to get to this, and have not had a number of time with my latest job change. This small POC will not get far, however I’ve discovered that if I begin following a protracted tutorial or course or guide, I am going to dedicate extra time in order that I can end it.
By the way in which, I extremely advocate the guide in case you are using Sanic.
Onward!
IMPORTANT UPDATE: This submit was written and utilized a free Heroku Dyno. On August 25, 2022, it was introduced that the free tier can be going away on November 28, 2022. All of this can proceed to work, however you will not be capable of make the most of the free tier to attempt it out after that date.
Drawback
The issue I encounted throughout this POC wasn’t the combination, like I anticipated. As an alternative, the issue I bumped into was determining the place I might deploy this POC for gratis. I thought of ngrok, however that meant leaving one thing operating on my machine till my staff had an opportunity to play with the POC. As an alternative, I turned to Heroku. The subsequent downside I bumped into was figuring out find out how to deploy a Sanic utility to Heroku. Google returned 5 yr previous articles, discussion board posts that do not have solutions (denvercoder9, is that you simply?), and Flask tutorials.
Toy Sanic App
Earlier than I get to the answer, here’s a toy Sanic app that merely prints Okay! whenever you hit the basis endpoint. Save this in a file known as server.py
from sanic import Sanic
from sanic.response import textual content
import os

app = Sanic(__name__)

@app.get("https://andrewwegner.com/")
async def root_path(request):
    return textual content("Okay!")

app.run(host="0.0.0.0", port=os.environ["PORT"], debug=True, access_log=False)
The one necessary factor to note is that port parameter in app.run(). Heroku provides the port it’s listening on on an surroundings variable, and that is wanted for Sanic.
The fast answer
In Adam’s guide, within the “Organizing a Challenge” chapter, he reveals that operating an utility makes use of a command like:
sanic src.server:app -p 7777 --debug --workers=2
Simplifying that command a bit and organising the Heroku Procfile (capitization issues and no extension) I’ve a single line in my Procfile that reads:
Making a necessities.txt file with Sanic as an merchandise was additionally required. For those who’re utilizing a virtualenv, you’ll be able to merely pip freeze > necessities.txt to get all the things in your surroundings into the file.
Thus, my listing seems like this:
./poc
    Procfile
    necessities.txt
    server.py
Push this to Heroku and the appliance fires proper up.
Extra particulars
I didn’t have a private Heroku account or the CLI put in on my machine earlier than beginning. That was simply resolved by creating an account at Heroku. For the heroku-cli, I adopted the documentation to get that arrange. Specifically:
curl https://cli-assets.heroku.com/set up.sh | sh
Notice: This does require sudo.
As soon as that is achieved, I verified the set up:
$ heroku --version
heroku/7.60.2 linux-x64 node-v14.19.0
Arrange the brand new utility in your Heroku account by logging in. Then click on New then Create new app.
Enter a novel utility title.
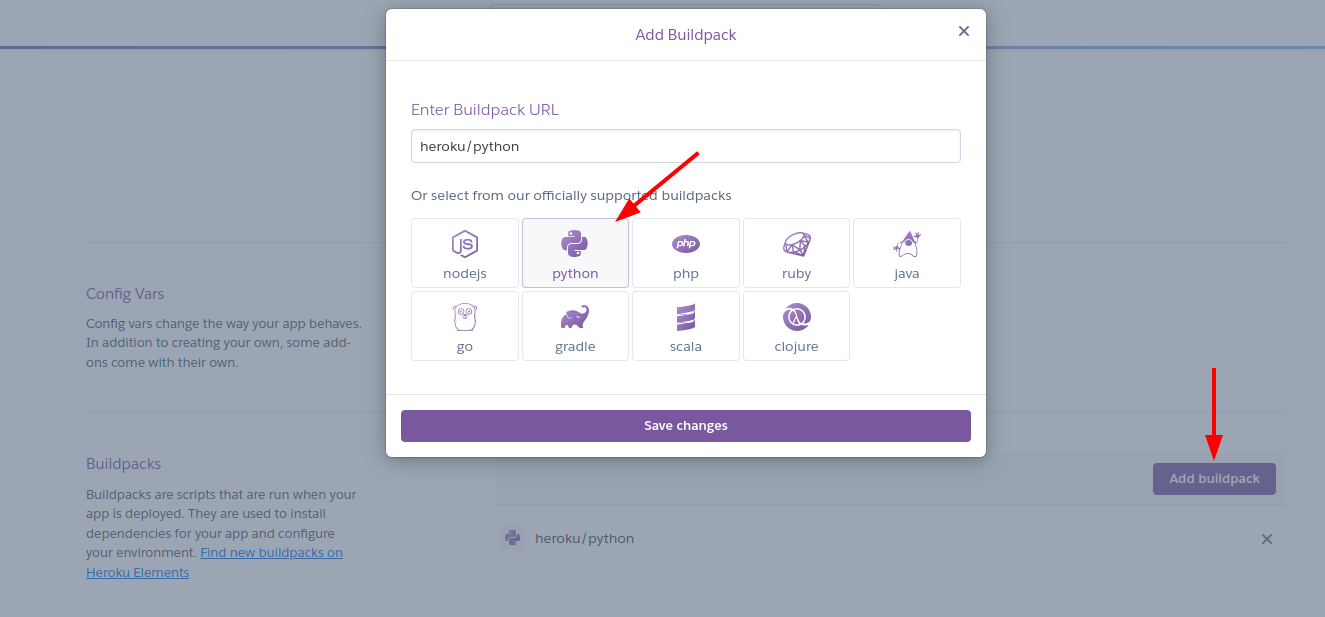
Then add Python to the construct path. Do that by going to Settings -> Add buildpack -> Deciding on Python and clicking save.
The subsequent step is organising the 2 information I discussed earlier – Procfile and necessities.txt. For the reason that Procfile is a single line for this easy proof of idea, that may been achieved in a single line from the shell.
$ echo "net: sanic server:app" > Procfile
Assuming you have been utilizing a virtualenv – since you ought to be utilizing a virtualenv – the necessities.txt file is simply as simple.
$ pip freeze > necessities.txt
Every part is setup and able to be loaded to Heroku. Subsequent, login in your terminal. I used the browser based mostly methodology, however you are able to do this fully within the command line if you want. My command was:
Final, I arrange a heroku git distant endpoint in order that I might push
heroku git:distant -a NAME_OF_YOUR_HEROKU_APP
git add .
git commit -m "Deployment commit"
git push heroku grasp
Change NAME_OF_YOUR_HEROKU_APP to match the title you enter within the UI when setting it up.
Wait a minute or so, after which navigate to NAME_OF_YOUR_HEROKU_APP.herokuapp.com and see Okay!
Ending up
With the steps above, I obtained a quite simple Sanic proof of idea operating on Heroku in a matter of minutes. This was very useful as I used to be in a position to simply present my staff that the work we’re pondering of doing could be achieved. All informed, my proof of idea took two hours of time. The subsequent step will likely be constructing a manufacturing model.