

Deploying databases on Kubernetes is getting simpler yearly. The half that also hurts is making deployments repeatable and predictable throughout clusters and environments, particularly from Steady Integration(CI) perspective. That is the place PR-based automation helps; you’ll be able to evaluate a plan, validate modifications, and solely apply after approval, earlier than something touches your cluster.
If you happen to’ve ever put in an operator by hand, utilized a couple of YAMLs, modified a script “only a bit”, after which watched the identical setup behave in another way in one other setting, this publish is for you.
On this tutorial, we’ll deploy Percona Operator for MySQL and a pattern three-node MySQL cluster utilizing OpenTofu – a totally open-source Terraform fork. Then we’ll take the very same deployment and run it by CI utilizing OpenTaco (previously generally known as Digger), in order that infrastructure modifications might be validated and utilized from Pull Requests.
We’ll use this demo repository all through the information: GitHub Demo Percona Operator MySQL OpenTaco.
What OpenTaco provides to OpenTofu
OpenTofu and OpenTaco shine when infrastructure and databases have to be reviewed, validated, and permitted earlier than they ever contact the cluster.
Databases are central to most stacks, and modifications needs to be dealt with with extra care. We would like a workflow the place updates are reviewed and validated earlier than they’re ever deployed to a cluster. That’s precisely what OpenTofu + OpenTaco allows: a PR reveals the plan output for evaluate, and apply occurs solely whenever you approve it.
OpenTofu (and Terraform) already provides us the “Infrastructure as Code” half: plan what is going to change, apply it, and retailer state. The issue is operational, for instance, in a workforce: who runs “apply”, when do they run it, and the way can we keep away from collisions?
OpenTaco sits on prime of your present CI system (in our case, GitHub Actions). As an alternative of somebody manually working tofu plan and tofu apply, you’ll be able to run these steps by a Pull Request workflow, the place:
- A pull request can set off a plan and present leads to the PR
- Apply occurs in a managed method (for instance, after approval/merge, or when somebody explicitly requests it)
- Concurrent modifications are prevented through locking
- The identical steps are repeatable in each setting
By the top of this weblog publish, we could have:
- Percona Operator for MySQL working in your Kubernetes cluster
- A pattern PerconaServerMySQL customized useful resource deployed
- A 3-node MySQL cluster (Group Replication) and HAProxy pods created by the operator
- OpenTofu state saved remotely (GCS or S3), which issues for CI
- OpenTaco for IaC PR automation
Conditions
You want a Kubernetes cluster you’ll be able to attain utilizing kubectl. That may be native (type/minikube) or managed (GKE/EKS/AKS). Earlier than going additional, make certain these work:
|
kubectl cluster–information
# Output Kubernetes management aircraft is working at https://34.57.102.230
kubectl get nodes
# Output NAME STATUS ROLES AGE VERSION gke–k8s–testing–auto–k8s–testing–auto–31c0c085–16vr Prepared <none> 13h v1.32.9–gke.1675000 gke–k8s–testing–auto–k8s–testing–auto–4cd48431–vd43 Prepared <none> 13h v1.32.9–gke.1675000 gke–k8s–testing–auto–k8s–testing–auto–b5c8ecb0–scp4 Prepared <none> 13h v1.32.9–gke.1675000 |
You’ll additionally want:
- OpenTofu (tofu)
- Git
- Non-obligatory: a MySQL shopper to check connectivity
Demo repository construction
This mission automates deploying the Percona Operator for MySQL to Kubernetes utilizing OpenTofu (a Terraform fork) and Digger for CI/CD.
|
demo–percona–operator–mysql–opentaco/ ├── .github/ │ └── workflows/ │ └── digger_workflow.yml # GitHub Actions CI/CD workflow ├── opentofu/ # OpenTofu infrastructure code │ ├── principal.tf # Predominant infrastructure definitions │ ├── variables.tf # Enter variables │ └── variations.tf # Model constraints & backend config ├── digger.yml # Digger CI/CD configuration ├── README.md # Mission documentation └── .gitignore # Git ignore patterns |
What every half does:
- opentofu/ doesn’t handle Kubernetes objects straight. As an alternative, it manages the motion of working these scripts in a repeatable method.
- digger.yml tells OpenTaco what “mission” to run and which steps to execute for plan/apply/destroy.
- digger_workflow.yml, right here now we have GitHub Actions workflow(s) that run OpenTaco
Run it regionally with OpenTofu (Primarily based on Helm)
Earlier than we carry OpenTaco into the image, it’s value working the deployment as soon as regionally with OpenTofu. This isn’t a separate method; it’s the identical OpenTofu mission that OpenTaco will run later in CI. Doing it regionally first helps you affirm your Kubernetes entry and Helm chart behaviour with out additionally debugging CI credentials.
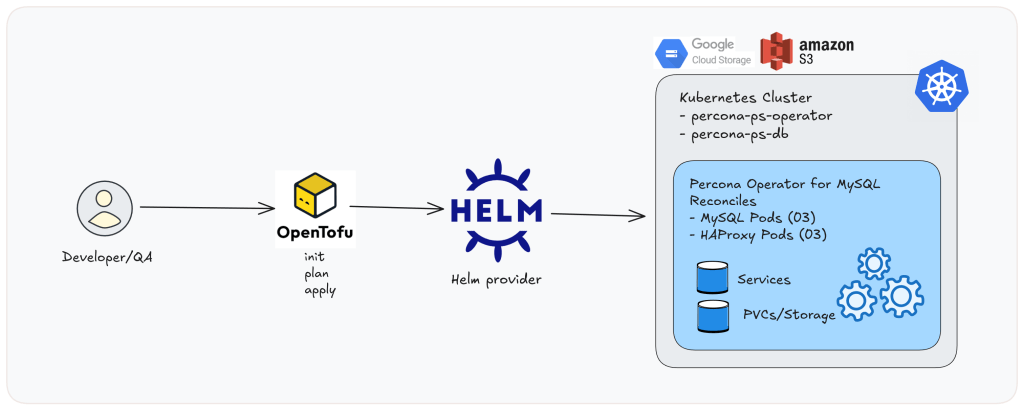
Image01: Native workflow overview.
- Let’s begin by cloning the repo and transferring into the OpenTofu mission
git clone https://github.com/gkech/demo–percona–operator–mysql–opentaco.git
cd demo–percona–operator–mysql–opentaco
cd opentofu
- Select the place the OpenTofu state will reside (native vs distant)
OpenTofu makes use of a state file to recollect what it deployed, so it could actually plan modifications and later destroy the identical sources cleanly.
- For native studying, the native state is ok.
- For CI and workforce utilization, want a distant state (shared and constant throughout runs, and might assist locking).
Choice A: native state (quickest to start out)
Remark out the backend block in variations.tf and run:
|
tofu init
—>> Exampe Output Initializing the backend... Initializing supplier plugins... Suppliers are signed by their builders. OpenTofu has created a lock file .terraform.lock.hcl to document the supplier OpenTofu has been efficiently initialized! You could now start working with OpenTofu. Attempt working “tofu plan” to see any modifications that are required for your infrastructure. instructions will detect it and remind you to do so if needed. |
Choice B: distant state on S3 (really useful for CI)
|
backend “s3” { bucket = “s3-k8s-testing-automation-edithturn” key = “percona-opentaco/terraform.tfstate” area = “us-east-1” } |
Choice C: distant state on GCS (additionally nice for CI)
|
backend “gcs” { bucket = “percona-demo-opentaco” prefix = “terraform/state” } <b>
</b> |
3. Run the tofu plan and tofu apply
tofu plan is a dry-run: it reveals precisely what OpenTofu would create/change/destroy, with out touching your cluster. In our case, it plans to create one namespace and two Helm releases (the Percona Operator chart and the MySQL cluster chart)
|
1 2 3 4 5 6 7 8 9 10 11 12 13 14 15 16 17 18 19 20 21 22 23 24 25 26 27 28 29 30 31 32 33 34 35 36 37 38 39 40 41 42 43 44 45 46 47 48 49 50 51 52 53 54 55 56 57 |
tofu plan
—>> Instance Output OpenTofu used the chosen suppliers to generate the following execution plan. Useful resource actions are indicated with the following symbols: + create
OpenTofu will carry out the following actions:
# helm_release.percona_db will likely be created + useful resource “helm_release” “percona_db” { + atomic = false + chart = “ps-db” + identify = “percona-ps-db” + namespace = “opentaco-mysql” + repository = “https://percona.github.io/percona-helm-charts/” + standing = “deployed” + timeout = 300 + values = [ + <<–EOT “mysql”: “annotations”: “open”: “taco-taco” “resources”: “limits”: “memory”: “5G” “requests”: “memory”: “2G” EOT, ] + confirm = false + model = “1.0.0” + wait = true + wait_for_jobs = false }
# helm_release.percona_operator will likely be created + useful resource “helm_release” “percona_operator” { + atomic = false + chart = “ps-operator” + identify = “percona-ps-operator” + namespace = “opentaco-mysql” + repository = “https://percona.github.io/percona-helm-charts/” + standing = “deployed” }
# kubernetes_namespace.percona will likely be created + useful resource “kubernetes_namespace” “percona” { + id = (recognized after apply) + wait_for_default_service_account = false }
Plan: 3 to add, 0 to change, 0 to destroy.
Modifications to Outputs: + namespace = “opentaco-mysql” + be aware = “Percona Operator and MySQL cluster deployed through Helm; see kubectl -n opentaco-mysql get pods” + operator_chart_version = (recognized after apply) |
Whenever you run tofu apply, OpenTofu executes this plan and really installs these Helm charts into the cluster. On this run, OpenTofu created the opentaco-mysql namespace first, then put in two Helm releases: percona-ps-operator (the Percona Operator) and percona-ps-db (the demo MySQL cluster). The ultimate “Outputs” part confirms what was deployed, together with the chart variations and the namespace.
|
1 2 3 4 5 6 7 8 9 10 11 12 13 14 15 16 17 18 19 20 21 22 23 24 25 26 27 28 29 30 31 32 33 34 35 36 37 38 39 |
tofu apply –auto–appove
—>> Instance Output
OpenTofu used the chosen suppliers to generate the following execution plan. Useful resource actions are indicated with the following symbols: + create
OpenTofu will carry out the following actions:
# helm_release.percona_db will likely be created # helm_release.percona_operator will likely be created # kubernetes_namespace.percona will likely be created + useful resource “kubernetes_namespace” “percona” { + metadata { + identify = “opentaco-mysql” } }
Plan: 3 to add, 0 to change, 0 to destroy.
Modifications to Outputs: + namespace = “opentaco-mysql” + be aware = “Percona Operator and MySQL cluster deployed through Helm; see kubectl -n opentaco-mysql get pods” + operator_chart_version = (recognized after apply) kubernetes_namespace.percona: Creating... kubernetes_namespace.percona: Creation full after 1s [id=opentaco–mysql] helm_release.percona_operator: Creating... helm_release.percona_operator: Nonetheless creating... [10s elapsed] helm_release.percona_operator: Creation full after 13s [id=percona–ps–operator] helm_release.percona_db: Creating... helm_release.percona_db: Creation full after 4s [id=percona–ps–db]
Apply full! Sources: 3 added, 0 modified, 0 destroyed. Outputs:
database_chart_version = “1.0.0” namespace = “opentaco-mysql” be aware = “Percona Operator and MySQL cluster deployed through Helm; see kubectl -n opentaco-mysql get pods” operator_chart_version = “1.0.0” |
On this demo, OpenTofu is the “orchestrator”: it describes what needs to be put in, after which makes use of the Helm supplier to put in it into your Kubernetes cluster.
Whenever you run tofu destroy, OpenTofu uninstalls the Helm releases, which removes the operator and the demo MySQL cluster (and regardless of the charts are configured to scrub up).
Confirm that the operator and cluster are working
Now, let’s affirm every part is working. Let’s verify the pods:
|
kubectl –n opentaco–mysql get pods
# Output NAME READY STATUS RESTARTS AGE percona–ps–db–haproxy–0 2/2 Operating 0 10m percona–ps–db–haproxy–1 2/2 Operating 0 9m55s percona–ps–db–haproxy–2 2/2 Operating 0 9m29s percona–ps–db–mysql–0 2/2 Operating 0 12m percona–ps–db–mysql–1 2/2 Operating 0 10m percona–ps–db–mysql–2 2/2 Operating 0 8m39s percona–ps–operator–77bc4755c5–pv5rz 1/1 Operating 0 12m |
You must see the operator pod, in addition to the MySQL and HAProxy pods created by the operator.
Verify the customized useful resource:
|
kubectl –n opentaco–mysql get perconaservermysql
# Instance Output NAME REPLICATION ENDPOINT STATE MYSQL HAPROXY percona–ps–db group–replication percona–ps–db–haproxy.opentaco–mysql prepared 3 3 |
|
1 2 3 4 5 6 7 8 9 10 11 12 13 14 15 16 17 18 19 20 21 22 23 24 25 26 27 28 29 30 31 32 33 34 35 36 37 38 39 40 41 42 43 |
kubectl –n opentaco–mysql describe perconaservermysql percona–ps–db
# Output Identify: percona–ps–db Namespace: opentaco–mysql Labels: app.kubernetes.io/occasion=percona–ps–db app.kubernetes.io/managed–by=Helm app.kubernetes.io/identify=ps–db app.kubernetes.io/model=1.0.0 helm.sh/chart=ps–db–1.0.0 Annotations: meta.helm.sh/launch–identify: percona–ps–db meta.helm.sh/launch–namespace: opentaco–mysql API Model: ps.percona.com/v1 Variety: PerconaServerMySQL Metadata: Finalizers: percona.com/delete–mysql–pods–in–order Spec: Backup: Enabled: true Picture: percona/percona–xtrabackup:8.4.0–4.1 Picture Pull Coverage: At all times Cr Model: 1.0.0 Mysql: Affinity: Anti Affinity Topology Key: kubernetes.io/hostname Annotations: Open: taco–taco Auto Restoration: true Cluster Sort: group–replication Expose Major: Enabled: true Grace Interval: 600 Picture: percona/percona–server:8.4.6–6.1 Picture Pull Coverage: At all times . . . Occasions: Sort Motive Age From Message —— ——— —— —— ———– Warning ClusterStateChanged 18m ps–controller -> Initializing Warning ClusterStateChanged 12m ps–controller Initializing -> Prepared |
This could present the operator is reconciling, and the cluster turns into prepared.
Now, let’s verify Companies:
|
kubectl –n opentaco–mysql get svc
—>> Instance Output NAME TYPE CLUSTER–IP PORT(S) AGE percona–ps–db–haproxy ClusterIP 34.118.234.180 3306/TCP,3307/TCP,3309/TCP... percona–ps–db–mysql ClusterIP None 3306/TCP,33062/TCP... percona–ps–db–mysql–main ClusterIP 34.118.227.76 3306/TCP,33062/TCP... percona–ps–db–mysql–proxy ClusterIP None 3306/TCP,33062/TCP,33060/TCP... percona–ps–db–mysql–unready ClusterIP None 3306/TCP,33062/TCPTCP... |
We will see the providers for main and HAProxy
Fast connectivity check
Extract the MySQL root password:
|
kubectl –n opentaco–mysql get secret percona–ps–db–secrets and techniques –o jsonpath=‘{.information.root}’ | base64 –d && echo
# Instance Output r]#s.KM~uu4XT |
Port-forward to the first service
|
kubectl –n opentaco–mysql port–ahead svc/percona–ps–db–mysql–main 3306:3306 Forwarding from 127.0.0.1:3306 -> 3306 Forwarding from [::1]:3306 -> 3306 |
Then join utilizing a MySQL shopper:
|
mysql –h 127.0.0.1 –u root –p Enter password: Welcome to the MySQL monitor. Instructions finish with ; or g. Your MySQL connection id is 4544 Server model: 8.4.6–6 Percona Server (GPL), Launch 6, Revision dbba4396
Copyright (c) 2000, 2025, Oracle and/or its associates.
Oracle is a registered trademark of Oracle Company and/or its associates. Different names could be emblems of their respective homeowners.
Sort ‘assist;’ or ‘h’ for assist. Sort ‘c’ to clear the present enter assertion.
mysql> |
As soon as linked, let’s strive:
|
mysql> SHOW DATABASES; +———————————————–+ | Database | +———————————————–+ | information_schema | | mysql | | mysql_innodb_cluster_metadata | | performance_schema | | sys | | sys_operator | +———————————————–+ 6 rows in set (0.10 sec) |
If this works, our MySQL cluster is working accurately! Wohoo!!
Clear Up (Destroy Every part)
After we’re performed, we will run: tofu destroy. It will uninstall each Helm releases (the operator and the demo MySQL cluster) after which delete the opentaco-mysql namespace, leaving your Kubernetes cluster itself untouched.
|
cd opentofu tofu destroy –auto–approve
—>> Instance Output OpenTofu will carry out the following actions:
# helm_release.percona_db will likely be destroyed # helm_release.percona_operator will likely be destroyed # kubernetes_namespace.percona will likely be destroyed Plan: 0 to add, 0 to change, 3 to destroy. |
That is the half that makes the demo helpful for groups.
As soon as your repo is linked to OpenTaco Cloud (through the GitHub App), OpenTaco makes use of GitHub Actions to run your OpenTofu mission and report outcomes again to the Pull Request.
So that you don’t want somebody to run tofu manually on their laptop computer; your PR turns into the workflow.
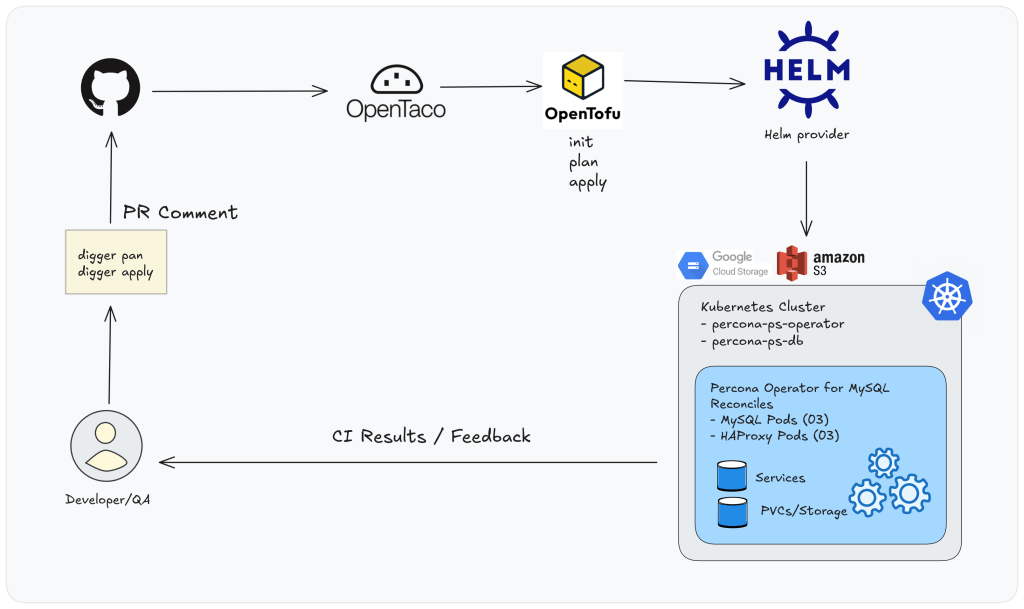
Image02: PR-based workflow overview.
1. Join your repository to OpenTaco Cloud
1. Set up the GitHub App:
- Go to: otaco.app, create an account
- Choose your repo
- Approve permissions
After that, OpenTaco can react to PRs and run workflows.
2. How OpenTaco is aware of what to run: digger.yml
OpenTaco (Digger) reads digger.yml in your repo to seek out:
- the place your OpenTofu mission lives (opentofu/)
- which instrument to make use of (opentofu)
- which steps to run for plan and
apply
|
1 2 3 4 5 6 7 8 9 10 11 12 13 14 15 16 17 |
initiatives: – identify: percona–opentaco dir: opentofu workspace: default instrument: opentofu workflow: default
workflows: default: plan: steps: – init – plan apply: steps: – init – apply |
3. Register Actions Secrets and techniques
Let’s configure first GitHub Actions secrets and techniques as a result of the runner wants entry to:
- your Kubernetes cluster (GKE in our instance), and
- your distant state backend (GCS or S3),
You want these secrets and techniques in GitHub:
For GKE entry:
- GOOGLE_CLOUD_CREDENTIALS (the complete service account JSON)
- GCP_PROJECT_ID
- GKE_CLUSTER_NAME
- GKE_CLUSTER_REGION
For S3 backend (if you happen to use it):
- AWS_ACCESS_KEY_ID
- AWS_SECRET_ACCESS_KEY
- AWS_REGION
Observe: When your state backend is S3, OpenTofu wants AWS credentials throughout init to learn/write the state file. So in CI, it’s essential to authenticate to AWS (along with GKE/GCP). On this instance, we use S3, so our GitHub Actions workflow contains an AWS credentials step earlier than Digger runs.
|
– identify: Configure AWS credentials makes use of: aws–actions/configure–aws–credentials@v4 with: aws–entry–key–id: ${{ secrets and techniques.AWS_ACCESS_KEY_ID }} aws–secret–entry–key: ${{ secrets and techniques.AWS_SECRET_ACCESS_KEY }} aws–area: ${{ secrets and techniques.AWS_REGION }} |
4. Testing PR-based workflow with OpenTaco
Now that now we have the credentials, we create a department and alter one thing underneath opentofu/ (for instance: bump the chart model, alter MySQL reminiscence limits, change values handed to the chart). On this instance, we’re altering the identify of the namespace to opentaco-mysql-test within the variables.tf file.
Subsequent step is to open a Pull Request and add a remark, with:
OpenTaco will run tofu init + tofu plan in GitHub Actions and publish the plan output again to the PR.
Nothing is deployed but; it is a dry run.
Whenever you’re prepared, run:
OpenTaco will run tofu init + tofu apply. This installs/updates the identical Helm releases you examined regionally:
- The Percona Operator chart
- the MySQL cluster chart
After digger apply is utilized efficiently, we will verify the output that appears like this:
5. OpenTaco UI (otaco.app): what it’s for
Apart from PR feedback, otaco.app provides you a fast view of:
- Which repos are linked
- current plan/apply jobs
- timestamps and standing (succeeded/failed)
- outputs captured from runs
6. Confirming it labored (CI and state)
You must be capable to confirm that the cluster sources exist. Let’s discover the pods.
|
1 2 3 4 5 6 7 8 9 10 11 12 13 14 15 16 17 18 19 20 21 22 |
kubectl –n opentaco–mysql–check get pods # –>> Instance Output NAME READY STATUS RESTARTS AGE percona–ps–db–haproxy–0 2/2 Operating 0 8m59s percona–ps–db–haproxy–1 2/2 Operating 0 8m38s percona–ps–db–haproxy–2 2/2 Operating 0 8m18s percona–ps–db–mysql–0 2/2 Operating 0 9m49s percona–ps–db–mysql–1 2/2 Operating 0 9m2s percona–ps–db–mysql–2 2/2 Operating 0 8m14s percona–ps–operator–676bf7c664–d2hdp 1/1 Operating 0 9m56s
kubectl –n opentaco–mysql–check get svc # –>> Instance Output
NAME TYPE CLUSTER–IP EXTERNAL–IP PORT(S) AGE percona–ps–db–haproxy ClusterIP 34.118.229.10 <none> 3306/TCP,3307/TCP,3309/TCP,33060/TCP,33062/TCP 10m percona–ps–db–mysql ClusterIP None <none> 3306/TCP,33062/TCP,33060/TCP,6450/TCP,33061/TCP 10m percona–ps–db–mysql–main ClusterIP 34.118.228.29 <none> 3306/TCP,33062/TCP,33060/TCP,6450/TCP,33061/TCP 10m percona–ps–db–mysql–proxy ClusterIP None <none> 3306/TCP,33062/TCP,33060/TCP,6450/TCP,33061/TCP 10m percona–ps–db–mysql–unready ClusterIP None <none> 3306/TCP,33062/TCP,33060/TCP,6450/TCP,33061/TCP 10m |
You also needs to see the state object created in your backend.
For S3:
|
aws s3 ls s3://s3-k8s-testing-automation-edithturn/percona-opentaco/ –recursive 2025–12–21 20:20:02 1316 percona–opentaco/terraform.tfstate |
You’ll see JSON describing the OpenTofu useful resource (the sort as “helm_release”) and the outputs like namespace and be aware. That’s anticipated: OpenTofu is monitoring the execution wrapper, not every Kubernetes object.
|
1 2 3 4 5 6 7 8 9 10 11 12 13 14 15 16 17 18 19 20 21 22 23 24 25 26 27 28 29 30 31 32 33 34 |
aws s3 cp s3://s3-k8s-testing-automation-edithturn/percona-opentaco/terraform.tfstate – | jq
# –>> Example Output { “version”: 4, “terraform_version”: “1.6.6”, “serial”: 1, “lineage”: “9826ce3b-e10b-ed80-a19e-d433c5731b92”, “outputs”: { “database_chart_version”: { “value”: “1.0.0”, “type”: “string” }, “namespace”: { “value”: “opentaco-mysql-test”, “type”: “string” }, “note”: { “value”: “Percona Operator and MySQL cluster deployed via Helm; see kubectl -n opentaco-mysql-test get pods”, “type”: “string” }, “operator_chart_version”: { “value”: “1.0.0”, “type”: “string” } }, “resources”: [ { “mode”: “managed”, “type”: “helm_release”, “name”: “percona_db”, “provider”: “provider[“registry.terraform.io/hashicorp/helm“]”, “situations”: [ { |
7. Clean up
If you prefer to remove the database cluster and operator directly with Kubernetes/Helm, follow the official docs: Percona Operator for MySQL uninstall/delete cluster steps
Closing
At this point, you have a repeatable method for deploying the Percona Operator for MySQL and a demo MySQL cluster on Kubernetes. You can now run the same workflow locally or from a CI/CD pipeline. Your deployment becomes documented, reproducible, and team-friendly.
If you’d like to explore further, check out the demo-percona-operator-mysql-opentaco repo and try a few changes of your own. We’re happy to help if you run into issues with OpenTaco or the Percona Operator for MySQL. And if you do play with it, tell us how it went, share your findings, ideas, or improvements with us!
About the Authors
 Edith Puclla
Edith Puclla is a Technology Evangelist at Percona Corporation, a CNCF Ambassador, an open source contributor with a background in DevOps, and a Docker and Kubernetes enthusiast.
 George Kechagias
George is a Senior Software Engineer at Percona and a member of the Cloud Engineering team, where he works on the open-source Percona Kubernetes Operators. His interests include distributed systems, domain-driven design, databases, and production-grade infrastructure.